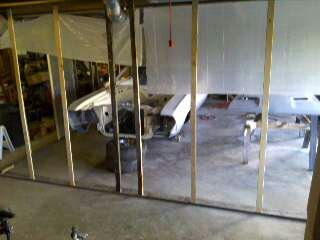
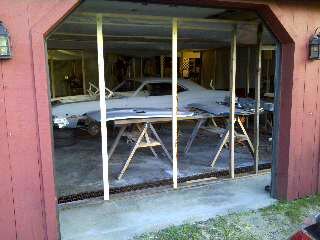
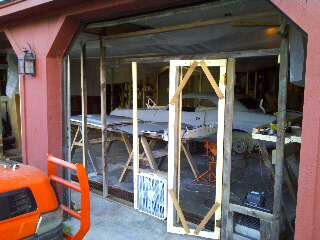
We just finished the final stage of clear on my 73 Challenger in my home made paint booth and I thought I would share my experience on how it went. To build the paint booth I used some old wood I had laying around my barn for framing along with purchasing some plastic and some 1”x3” strapping. I work in the HVAC industry and pulled a couple of blowers out of some old warm air furnaces that were getting thrown away, put a couple of air filters on the opposite end and put together a little door to get in and out of. Altogether I may have about $200 into it. Without the stuff I had lying around and the stuff I picked up for fee I would estimate about double that. Looking back I feel that one of the most important advantages my doing it myself is that you can “tweak” little flaws that you might of missed in the body work process. I blocked my car down for at least 4 months and there was still a little ½ dime size divot on top of the fender that I somehow missed. We were able to work that smooth with the 3 coats of paint. If I had someone else do it I don’t know if that would of happened or not. With us doing it I know it got taken care of. I did the same thing you did and asked a person I know that owns a very large, state of the art auto body shop in my area what it would cost me for paint and clear ONLY. He gave me a price between $3,000 and $4,000. Cost of me to do my paint job on my car was about $2,000. Sealer, PPG DBC paint and clear with all hardeners and reducers totaled $1,250. Shop supplies that included degreaser, paint suite, thinner for cleanup, sand paper, paint gun filters, new mask, nice new “dry” air hose, wipes and I’m sure I missed a few things was about $200. My friend who did the paint and has experience painting cars came over multiple times throughout the preparation process and I paid him $600 (probably worked out to about only $10 to $12 / hr. or less but we had fun hanging out together).
Building the paint booth took a long time. It ate up a good two to three days of my vacation. I cut cardboard boxes to make strips and stapled them to the outside of the plastic to connect the plastic to the wood studs / strapping. I used thicker mil plastic for the ceiling and just the thin autobody masking plastic for the walls and door. Everything is “temporary” so lots of duct tape was used. I left he thin plastic with some overlap on the floor side and the door so it could be rolled up and work as a gasket after I stapled some cardboard straps I made on it. With the two fans going I estimate I had about 3200 CFM’s being pulled out of the paint booth. The dimension of the booth is about 25’ x 18’.
Okay, now for the bad part and I am happy to share this experience.… Last week we picked a day to get it sealed, painted and clear coated and we learned two major lessons about a homemade paint booth. #1 bugs and #2 making sure surface is clean, clean, clean. We started the day by prepping the surface for sealer. The sealer went down perfect. Next three coats of paint. The paint looked awesome. That little ½ dime shaped area I told you about earlier took a little time to fix because it was a very humid day and it was taking a long time for the paint to dry in in-between coats. The good news is we were able to get the little divot fixed with a little extra paint in that area. The bad news was it was about 8pm and although we did not mind working through the night to get it finished, it was not a good idea. I don’t know where you live but I live in the middle of the woods in Vermont. The Vermont state bird is a mosquito. My garage light is probably the only light that is on in a square mile so every little bug that was within that square mile was knocking on the side of the paint booth wanting to come in. Although everything was very well sealed off all it took was one opening of the door to the paint booth and it probably sucked in about 12 little bugs and bugs stick to clear coat like a juncky to a crack pipe. The clear went on great except for about 15 little bugs stuck to it. Now for lesson #2. The next day (labor day) we sanded the areas where the bugs were, hit sealer in a few areas that we had to put color back on to, whipped the car down with grease / was remover but the lesson learned here was we did not wipe down good enough. We got some pretty good fish eying happening when we put the next coat of clear on in the areas where we sanded the bugs out. The only thing we could think of is the dust from the sanding is what caused the fish eying. My friend wound up laying a good thick coat of clear on so we could have something to work with to sand the fish eyes out. Jump ahead to yesterday (being Saturday as we both work for a living and can only do this on the weekends or vacation) we wet sanded / fixed the fish eye areas, we had to wet sand down the whole car to get a mechanical bond for the clear as it was more than 72 hours between coats for the chemical bond. Then we wiped the whole car down with PPG wax and grease remover. Then after that we wiped the whole car down with PPG wax and grease remover. Then after that we wiped the whole car down with PPG wax and grease remover. Kind of like Bart Simpson having the teacher wright on the chalk board 100 times “I will wipe the car down with wax and grease remover”. Then we tacked it off with some nice new tack clothes and shot it with a nice coat of clear. It looks AWESOME.
So, to sum things up from my experience, don't paint at night in a part of the country that has a lot of bugs. Clean, clean, clean the surface. It’s a LOT more work to build your own paint booth and do it yourself. You can fix flaws along the way where a hired shop may not do that (don’t know... depends on the shop)?? I saved “some” money but not as much as I thought I would, good paint costs a lot of $$$. Even with the bug and fish eye disaster I'm still very, very happy with the outcome of the paint job. I have the ability to say “I (my friend and I) painted it”.
Hope this helps.


