• Welcome to For E Bodies Only !

    We are a community of Plymouth Cuda and Dodge Challenger owners. Join now! Its Free!

73 Soft Pedal Learning Process

Every old Mopar I've driven with power brakes seem to have low brake pedals. So you're probably OK with everything now. When the self adjusters are working properly, it's difficult to remove the rear drums without manually loosening the star wheel. It's kinda of a pain. You have to hold the lever out of the way as you turn the toothed section. 9 times out of 10 I tighten the dang thing first!
 
Every old Mopar I've driven with power brakes seem to have low brake pedals. So you're probably OK with everything now. When the self adjusters are working properly, it's difficult to remove the rear drums without manually loosening the star wheel. It's kinda of a pain. You have to hold the lever out of the way as you turn the toothed section. 9 times out of 10 I tighten the dang thing first!
Xcudame,

Thanks - after researching quite a bit over the weekend, I tend to agree.

My car has the clutch and brake pedals from my old 72, manual all-drum car.

I bought a power master cylinder years ago for a disk brake swap that never happened, because the 73 I bought had a much better body to restore than the 72 and had been a 340 car with sure grip rear and HD suspension. When I had the car restored, they put the MC I had on a new booster.

Over the weekend I went to the Carlisle Farirgrounds PA Mopar show and talked to a couple of owners, and I also visited the Ebodies.com tent and talked to several very helpful folks there. They all agreed on two things: power brakes can be a pain, and my brakes engaging so low to the floor is not right. They thought I should bleed my MC.

I did not get an answer on the resting pedal height there, but reading articles on the Ebodies.com forum and our forum over the weekend seem to indicate the pedal will be lower on a power brake set up and about even with the accelerator pedal. On a manual brake car, the pedal will be even with the clutch pedal.

One thing I had not considered was the position of the brake light switch. After reading that this might be important, and possibly blocking the pedal from raising fully to rest height, I checked that out. Well, it does not block the pedal from rising, but it was fastened all the way forward. I made a spacer for .140 in (about 3.56mm) and adjusted the switch position this morning. I haven't tested it yet, but another article on this forum suggests the switch being too far forward could put pressure on the MC.

 
The thread I referred to above was started by Enforcer505 in August 2025. But his problem was overheating his brakes; apparently backing his brake switch off a tad helped.

So at this point I believe I need to bleed the MC, which I intend to do with it still mounted (per that Richard Eherenberg article). Presumably I will have to bleed the lines again after that.

I am not sure what bore size my MC has, just that it is a power MC.

I noticed today that the fluid level in the large, or rear compartment in the MC was down a bit, maybe a quarter inch from when we refilled it last week while bleeding the lines. I refilled it to 1/4 in below the rim. If there is a brake fluid leak, I could not find it when I checked all the fittings today. The pedal was firm with the engine off.

Anyway I am studying the art of MC bleeding.
 
Thank you, I see it. I will definitely check that out. I wonder what happened there.
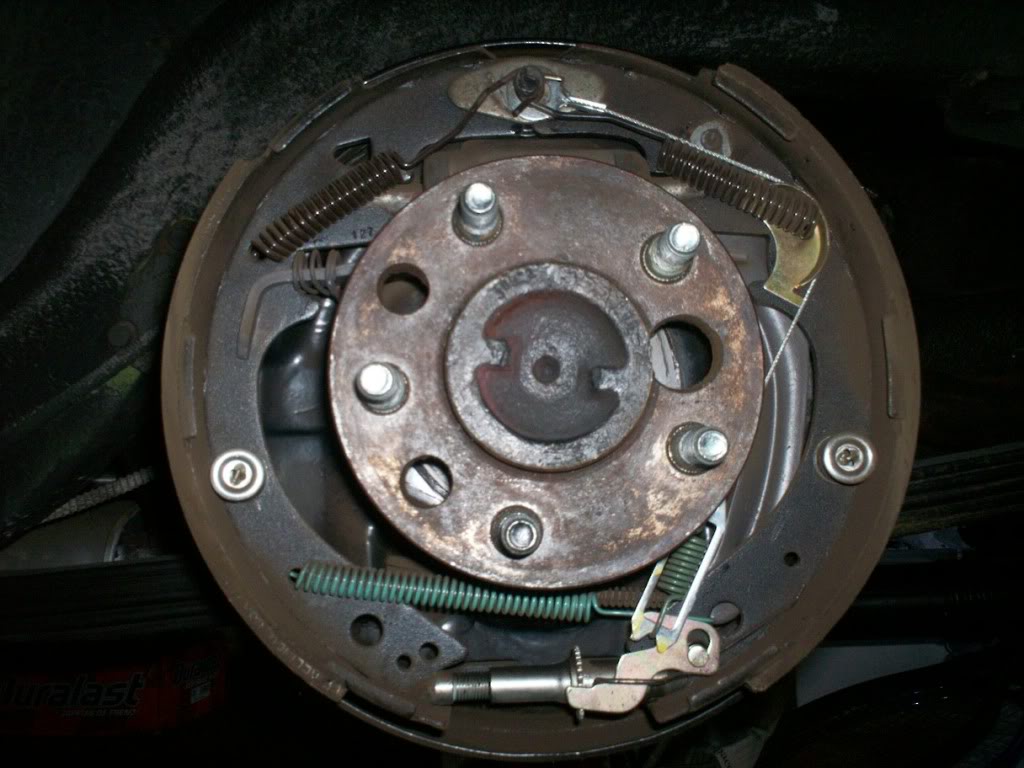
Here are a pair of photos of the lower section of the driver rear drum and passenger rear drum.

I compared them and figured out that the passenger set up is the same as my manual and other photos I found. I believe the green spring is the automatic adjuster spring and it fits into the holes in the shoes where my manual indicates (and You Tube videos, which are clearer).

On the driver side, I think the problem might be that the green spring they used is too thick to fit behind the adjuster lever. I reversed it, and I could not get it to fit. Further, there are no holes in the shoes where I could get it to fit when reversed.

If you look, the shop that set up the brakes used another, silver spring that stretches across the backing plate from shoe to shoe. So there are two springs on this rear brake; there is no second spring on the passenger side. This may be a workaround to compensate for the green spring covering a shorter distance than normal. Presumably the two springs together provide the necessary tension.

I had to leave things as they are for now. The green spring does touch the adjuster screw assembly but does not seem to interfere with it. I could rotate it by hand without difficulty.

I will try and get a narrower spring and replace the current green spring, but to install it I will have to remove that second spring. It is using at least one hole needed for the green spring.

Dvr Rear Drum Below.jpg


Psngr Rear Drum Below.jpg
 
The Green spring is in wrong hole
Is the E-brake cable seated? Seems to be coming out at weird angle.
Here's mine

 
Last edited:
You can get a factory service manual for free at mymopar.
As Katfish said green spring wrong and the silver spring in your pic should not be there at all.
Also note there is a primary and secondary springs at the top.
 
OK, thanks both of you for the quick replies.

There must be some variance in the number of holes in different replacement brake shoe sets. These are new shoes but I don't know who made them.

Passenger side -

To match Katfish's brake, which appears to be the driver side, I would have to reverse the green spring. But there is no small hole above the larger hole in the front shoe that would let me hook the small hook on the spring into. So the "thick" end of the spring is hooked into the rear shoe and the tail end is hooked to the large hole in the front shoe.

I am not sure if you all see an issue with the parking brake cable on the passenger side.

Driver side -

I will check the seat of the parking brake cable. This is not something I noticed. It does not seem loose or anything.

I can get rid of the silver spring and try installing the green spring with the thick end hooked to the small hole (front shoe) currently occupied by the silver spring, and hook the tail end to the large hole in the rear shoe. We will see if this thick spring will stretch that far.

Also, what issues do you see with the top springs? They are fully shown in pics I posted ealier in this thread.

thanks!
 
You need to remove that extra silver spring,
Then put the Green spring in that small hole on left side on pic, and large hole right side.
Same as my pic, you have same holes.
It's correct on the other side you have, match that.
 
Back
Top