• Welcome to For E Bodies Only !

    We are a community of Plymouth Cuda and Dodge Challenger owners. Join now! Its Free!

How to bench test standard dash ALT gauge?

JunkYardFind

Active Member
Joined
Feb 1, 2021
Messages
27
Reaction score
10
Location
Huntington Beach, California
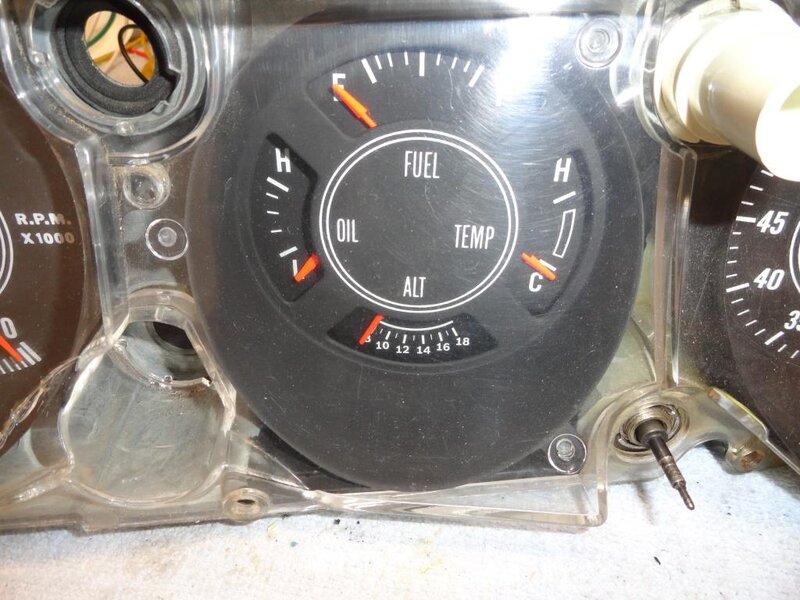
My ALT gauge was not working (only showing a neg charge even though the alt was charging fine) I have just pulled the gauge out of the assembly and there is not much to it. It looks perfect, no sign of....anything, looks new! What could make the gauge not work? I guess trace the wiring and maybe it was disconnected somewhere down the line? Not sure where to go from here.

Also, I have limited electrical experience so this is likely a dumb question....
Now that I have the ALT gauge off, how do I bench test it?
Any tips would be greatly appreciated!
 

70chall440

Well-Known Member
Joined
Dec 11, 2010
Messages
1,260
Reaction score
975
Location
Western Washington
 

JunkYardFind

Active Member
Joined
Feb 1, 2021
Messages
27
Reaction score
10
Location
Huntington Beach, California
Turns out E-Body ALT gauges are useless as well as dangerous!
Lets move on to how to fit an aftermarket Volt gauge.

I would start by removing the ALT gauge wires and splicing them together thusly bypassing the old ALT gauge.
I can now use the old ALT gauge, tear it apart and make an aftermarket volt gauge fit within the slot.
Where would I hook the the aftermarket Volt gauge to? I am thinking Pos to a switched fuse, and Neg all the way to the Battery neg terminal. Please correct me if I am wrong.
Lastly, any ideas on where to get a small volt meter that would fit (with obvious modifications) into the ALT gauge housing.
 
Last edited:

70chall440

Well-Known Member
Joined
Dec 11, 2010
Messages
1,260
Reaction score
975
Location
Western Washington
As to the volt gauge, any positive source will do. You do not need to run a ground to the battery, any good chassis ground will work.

As to what gauge to use, well I cannot answer that for an E body, I know they use a Bousch gauge for B bodies but that is much smaller. Look around at aftermarket gauges and try and find a short sweep large gauge. I would think someone has done it.
 

Bobby Sixkiller

Well-Known Member
Joined
Apr 22, 2020
Messages
120
Reaction score
97
I left my amp meter in the cluster after wiring around it. Got a small digital gauge and wired in. It’s a cheaper one from eBay. Small and flat. Mounted with double sided tape. It could be hidden really easily like inside the ashtray or console. I just put mine down low so I can see it but it’s kinda out of sight. Not worried about original perfection. No holes drilled. Easily removed
 

340challconvert

Well-Known Member
Joined
Feb 13, 2011
Messages
5,177
Reaction score
2,707
Location
Parsippany, NJ

Sunpro CP7985 CustomLine Electrical Voltmeter​


I made this conversion 3 years ago. I had one more anmeter.

I bought this sunpro gauge CP7985.

I dismantled the sunpro, they have a similar size.

I removed the face of the sunpro.

I cut the needle of the anmeter removed the anmeter face, modified it a little, and fixed them on the Sunpro. The anmeter face is screwed on the sunpro voltmeter.

1615214167556.png
 
Last edited:

Rons340

Well-Known Member
Joined
Jan 16, 2021
Messages
110
Reaction score
60
Location
Tennessee
I remember reading somewhere about one of the instrument repair companies being able to convert the original amp gauge to a volt gauge. I will try to locate that info. for you.
 

ZippyZoo

Well-Known Member
Joined
Oct 20, 2018
Messages
54
Reaction score
22
Location
Denver, CO
re: conversion to voltmeter.
If you don't care for the blue line on the Sunpro guage, there is a white line Bosch equivalent with the same part number as the Sunpro.
There are threads on FEBO and e-bodies.org which go through the steps. I can also share some pix from when I converted it.
 

Attachments

  • Voltmeter.JPG
    Voltmeter.JPG
    104.2 KB · Views: 171

72RoadRunnerGTX

Well-Known Member
Joined
Jan 8, 2013
Messages
192
Reaction score
113
Location
Shoreline. Washington
Turns out E-Body ALT gauges are useless as well as dangerous!
Please correct me if I am wrong.
Ok, ammeters are only useless to those who don’t understand the information they provide. They provide much more real-time charging system health information than any voltmeter can. A well-maintained ammeter with good insulators and connections is not dangerous at all, that’s a myth perpetuated for the most part by those who don’t understand them. There are other weaknesses in the original design that should be addressed first.

A discharge indication while running means the charging system is not keeping up with the vehicle load requirements, converting to a voltmeter will not solve that issue.
 
Last edited:

moparlee

Well-Known Member
Joined
Jul 25, 2011
Messages
2,896
Reaction score
1,204
Location
Mid Michigan
Ok, ammeters are only useless to those who don’t understand the information they provide. They provide much more real-time charging system health information than any voltmeter can. A well-maintained ammeter with good insulators and connections is not dangerous a all, that’s a myth perpetuated for the most part by those who don’t understand them. There are other weaknesses in the original design that should be addressed first.

A discharge indication while running means the charging system is not keeping up with the vehicle load requirements, converting to a voltmeter will not solve that issue.
Agree with you on that.
Let us know what the other weaknesses are in the original system.
 

JunkYardFind

Active Member
Joined
Feb 1, 2021
Messages
27
Reaction score
10
Location
Huntington Beach, California
I got it all done already. The bypass was done at some point prior to me owning the car. This rendered the Ammeter useless obviously. It was still connected on the separate bolts though, which threw me off. Anyway, I re-did a better bypass and converted the Ammeter a Volt meter....it's a pretty crazy mod that I will have a video of posted hopefully next week. Thanks for all the suggestions and help here!
 

72RoadRunnerGTX

Well-Known Member
Joined
Jan 8, 2013
Messages
192
Reaction score
113
Location
Shoreline. Washington
Agree with you on that.
Let us know what the other weaknesses are in the original system.
On these stock charging systems, by far the most common failure point with the original design are the Packard connectors in the charging system output circuit at the bulkhead connector. They were never designed to handle the charging/load current, have been problematic since very early on. Also prone to corrosion leading to resistance/heat build-up. By-pass those connections before by-passing a perfectly good, well maintained, ammeter. An undersized alternator can over stress that circuit as well. Aftermarket loads added to the battery terminals on a car with a functional ammeter will also create additional current flow across the ammeter and related wiring/connections. All vehicle operating loads need to be on the alternator side of the ammeter.
 

72RoadRunnerGTX

Well-Known Member
Joined
Jan 8, 2013
Messages
192
Reaction score
113
Location
Shoreline. Washington
There are three terminals that fit the 1327 housings depending on wire size. At the ignition switch connector, that would 10 of the PP30 (12 -14ga wire) and 6 of the PP15(16-20ga wire). I have come across some factory replacement ignition switches having 10ga wires for the red and black leads, used PP45s for those. The terminals will interchange, ie. PP30 on one side and a PP45 on the other.

A more recent E-body project shot, new dash harness, Molex cut off, Powerpoles installed.
IMG_0077.JPG


IMG_0079.JPG
 

JunkYardFind

Active Member
Joined
Feb 1, 2021
Messages
27
Reaction score
10
Location
Huntington Beach, California
There are three terminals that fit the 1327 housings depending on wire size. At the ignition switch connector, that would 10 of the PP30 (12 -14ga wire) and 6 of the PP15(16-20ga wire). I have come across some factory replacement ignition switches having 10ga wires for the red and black leads, used PP45s for those. The terminals will interchange, ie. PP30 on one side and a PP45 on the other.

A more recent E-body project shot, new dash harness, Molex cut off, Powerpoles installed.
View attachment 81998

View attachment 81997
This is GREAT info! Thanks
 
Back
Top