• Welcome to For E Bodies Only !

    We are a community of Plymouth Cuda and Dodge Challenger owners. Join now! Its Free!

My Replacement Heater Core Didn't Fit - Why and What To Do

bill70j

Active Member
Joined
May 4, 2021
Messages
26
Reaction score
40
Location
Los Osos, CA
I recently posted about my heater core failing and dumping coolant into the passenger side footwell. I had to replace the heater core and also rebuilt the heater box while I was at it.

But the replacement heater core wasn't a direct fit so I made some slight modifications which did the trick.

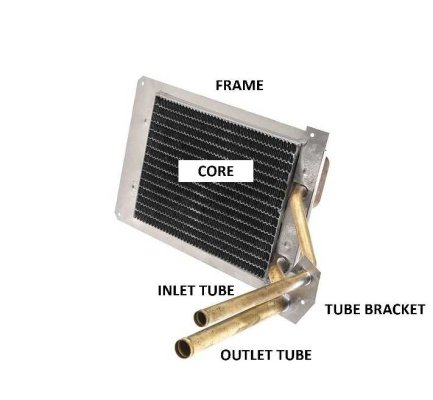
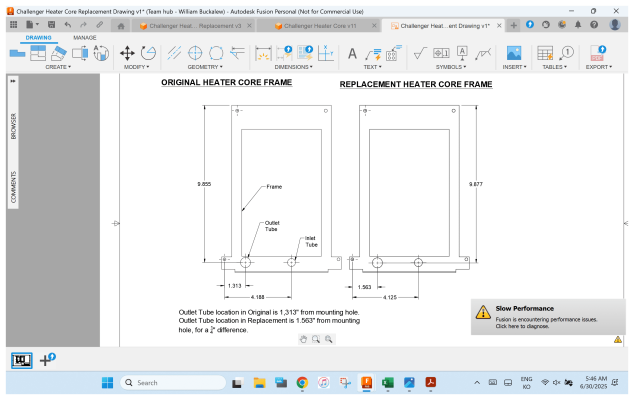
The replacement core seems to be nicely made. The frame mounting holes are in precisely the same location as the failed unit, which is original to the car. And the heater tubes look to be bent properly. But: 1) One side of the frame mounting flange was canted down by about 10 degrees, and 2) The outlet heater tube was misplaced by 1/4 inch, which was the bigger issue.

Here is what I had to do.
1) Put the frame in the vice and bend the one flange side to be in the same plane as the other three
2) Remove (de-solder) the tube mounting bracket
3) Modify the tube mounting bracket so it fits the heater box
4) Dog-leg the outlet heater tube so it lines up with holes in the heater box and firewall
5) Re-secure the tube mounting bracket to the tubes
6) Install the core in the heater box

This wasn't a big deal, and even though you guys warned me that the replacement box probably wouldn't fit, I was a trifle annoyed. But it worked out OK and I would do it over the same way -- though I doubt I'll have another failure in my lifetime. The photos show some more details.


Here's a stock photo of the replacement frame, core, tube mounting bracket, and tubes Generic Heater Core Image.jpg

Here's a screenshot of the comparative location of the tube holes in the frame (feeding the header box) - the original vs. the replacement
Screenshot 2025-06-30 054634.png


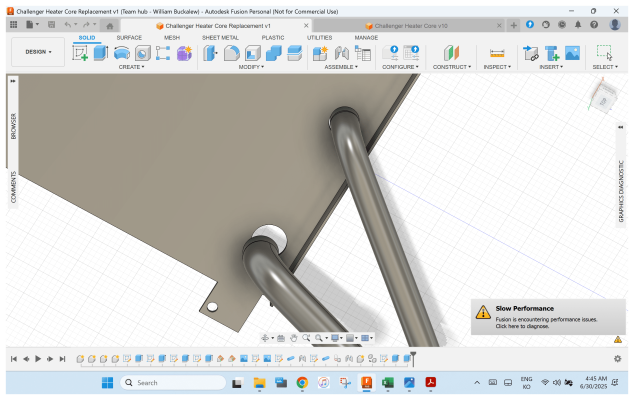
Here's a rendering of the original tube location and orientation as if trying to install in the replacement frame
Screenshot 2025-06-30 044526.png


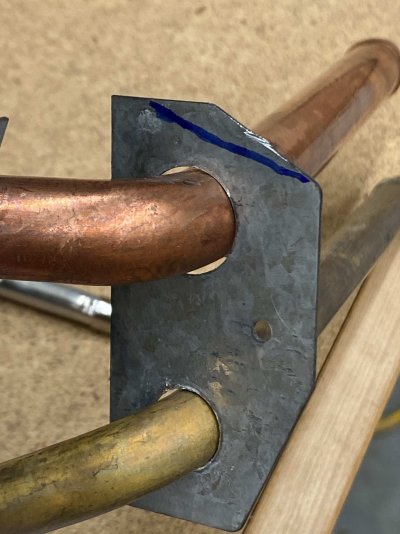
Here's the change to the tube mounting bracket, which goes along with having to re-orient it on the tubes. I removed the outer portion indicated above the blue line
New Heater Core Mods 2.jpg


Here's a dry fit of the unit in the box
New Heater Core Mods 1.jpg
 
Last edited:

terrywalker

Well-Known Member
Joined
Aug 31, 2013
Messages
514
Reaction score
329
So, I said I would let people know the heater core I selected for my 71 Challenger convertible as I stated in @bill70j other post on his heater core replacement. In my 72, I ordered from Rockauto a heater core, Four Seasons 91508. It fit with almost no problems into the heater housing for my 72 Challenger. It looks great. I have not installed it yet. For my 71 Challenger, I ordered a Duralast heater core 94508. I pick it up tomorrow. I looked at the heater cores I pulled out of both the 71 and 72 Challengers and I don't believe they are original cores, so I won't send them to Glen-ray. I'll let you know how the Duralast fits when I get it. See link for previous posts.
Removing a non-AC Heater Box
Here's the ones I removed. Heater core comparison in photo.

Heater Core 71 vs 72.jpg
 

terrywalker

Well-Known Member
Joined
Aug 31, 2013
Messages
514
Reaction score
329
Looking at the fin design on the 72 heater core, that one may be an original. The car was off the road since 1984 that I know of.
Terry W.
 

terrywalker

Well-Known Member
Joined
Aug 31, 2013
Messages
514
Reaction score
329
Here's the results of the Duralast Heater Core from Autozone as promised. It looked good after I unpacked it. I could tell as soon as I put it into the heater box it was going to need some adjusting. The inlet /outlet separator plate was not soldered on very well. As a matter of fact, the solder joints between the plate and inlet/outlet tubes came loose as soon as I started fitting it into the heater box. Not a problem. My torch with a 1 inch flame will be good to redo it. I found out later it was soldered on the tubes crooked and would not lie flat against the heater box case any way.
Here's a photo of it as received out of the box. I marked where it looked like I'd need to cut the plate with a brown line.
Terry W.

New Heater Core 1.jpg
 

terrywalker

Well-Known Member
Joined
Aug 31, 2013
Messages
514
Reaction score
329
I cut the plate and after fitting it several times to get it to fit in the heater box as it should, I thought, 'why not just bend the top of the plate down to radius it with the inside radius corner of the heater box. You can see in the photo the core is now placced where it needs to be. You can see the plate is not flat against the heater box near the smaller tube. This is where I decided to mark the plate where it needed to be and resolder it using my torch.
Made it easier.
Terry W.

New Heater core 3.jpg
 

bill70j

Active Member
Joined
May 4, 2021
Messages
26
Reaction score
40
Location
Los Osos, CA
How did you "desolder" the mounting bracket?
I used a butane torch to melt the solder and immediately puffed it off with air.

Re-soldering it was a different story. It probably would have been very easy for someone who's good at it - but that's not me. I had a bi*** of a time trying to get a good joint, given the space between the bracket holes and the OD of the tubes. I ended up JB-Welding it back on instead.

EDIT: Just read Terry's post above. He must be one of those guys who are good at sheet soldering.

1752516572344.png
 
Last edited:

terrywalker

Well-Known Member
Joined
Aug 31, 2013
Messages
514
Reaction score
329
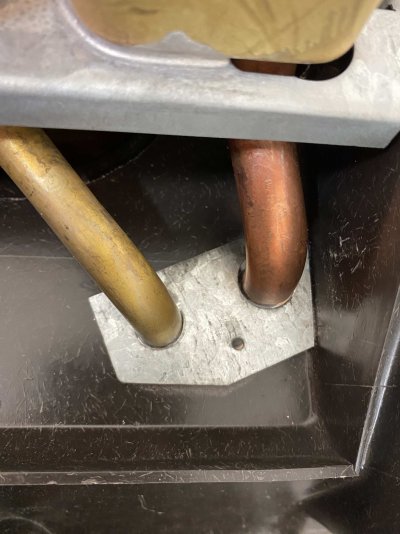
Here's the end result. It fits all the way around. I feel the Duralast core is okay but will require about 30 -45 minutes worth of work to get it to fit. I feel the Four Seasons core 91508 I got from Rock Auto required less work to fit although this wasn't bad. The Four Seasons core has a 12 month/12,000 mile warranty. The Duralast has a limited lifetime warranty. I'm glad @2bill70j shared his insights and started this topic. It gives some choices for those not doing a full restoration and have a driver. I don't think I would try to replace the heater core with the heater box in the car. I think that is what happened to my box and why a couple of the springs are missing, and I have to repair the heater box where they go. It not the first time I have to do this repair. Good info in this thread.
Terry W.

New Heater Core 6.jpg


New Heater Core 4.jpg
 

terrywalker

Well-Known Member
Joined
Aug 31, 2013
Messages
514
Reaction score
329
I just wanted to add that I will fill using some coolant in the new core using a funnel and will let it sit flat while I work on the rest of the case. If there is a leak in the new core, I'll see it after a few days.
Terry W.
 
Last edited:

don selleck

Well-Known Member
Joined
Dec 8, 2022
Messages
313
Reaction score
284
Location
michigan usa
I recently posted about my heater core failing and dumping coolant into the passenger side footwell. I had to replace the heater core and also rebuilt the heater box while I was at it.

But the replacement heater core wasn't a direct fit so I made some slight modifications which did the trick.

The replacement core seems to be nicely made. The frame mounting holes are in precisely the same location as the failed unit, which is original to the car. And the heater tubes look to be bent properly. But: 1) One side of the frame mounting flange was canted down by about 10 degrees, and 2) The outlet heater tube was misplaced by 1/4 inch, which was the bigger issue.

Here is what I had to do.
1) Put the frame in the vice and bend the one flange side to be in the same plane as the other three
2) Remove (de-solder) the tube mounting bracket
3) Modify the tube mounting bracket so it fits the heater box
4) Dog-leg the outlet heater tube so it lines up with holes in the heater box and firewall
5) Re-secure the tube mounting bracket to the tubes
6) Install the core in the heater box

This wasn't a big deal, and even though you guys warned me that the replacement box probably wouldn't fit, I was a trifle annoyed. But it worked out OK and I would do it over the same way -- though I doubt I'll have another failure in my lifetime. The photos show some more details.


Here's a stock photo of the replacement frame, core, tube mounting bracket, and tubesView attachment 141203


Here's a screenshot of the comparative location of the tube holes in the frame (feeding the header box) - the original vs. the replacement
View attachment 141204


Here's a rendering of the original tube location and orientation as if trying to install in the replacement frame
View attachment 141205


Here's the change to the tube mounting bracket, which goes along with having to re-orient it on the tubes. I removed the outer portion indicated above the blue line
View attachment 141206


Here's a dry fit of the unit in the box
View attachment 141207
ah this is the june 30th post different thread
 
Back
Top