• Welcome to For E Bodies Only !

    We are a community of Plymouth Cuda and Dodge Challenger owners. Join now! Its Free!

Rebuilt six pack carbs, now it won't idle

Righty Tighty

Well-Known Member
Joined
Mar 4, 2021
Messages
305
Reaction score
116
Location
Sahuarita, AZ
The actual issue is much more complicated than the title. This is long, so bear with me.

I've been going through my 440 six pack since I bought it a couple months ago - refreshing lines/hoses, changing gaskets, etc. One day I noticed fuel dribbling out of the rear outboard boosters while the car was idling. This was a steady production of drops, not quite a stream. I checked the float level and it was a tad high, so I lowered it. The problem continued.

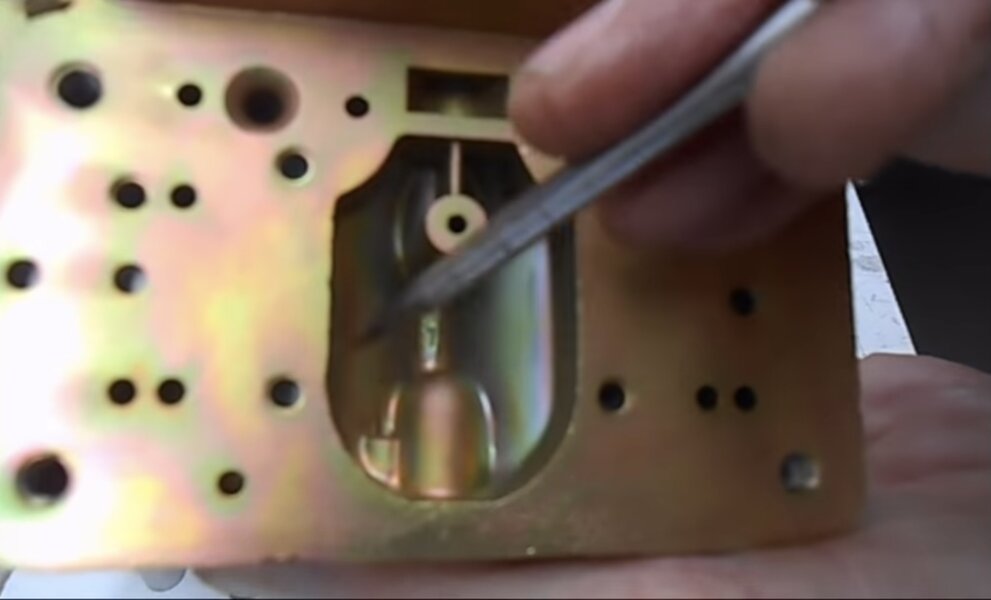
I figured since I had no idea how long the carbs had been sitting prior to me getting the car (although I was told it had sat for at least 10 years), that it wouldn't be a bad idea to at least open them up and freshen the gaskets, needles & seats, idle mixture screws, and clean out all the passages. Much to my surprise, the insides of the carbs looked great. I only saw one tiny piece of varnish jammed in the FRONT outboard, nothing in the rear. So I cleaned them, put em back together and back on the car. I confirmed all the throttle plates were closed, choke was already open since it's pretty warm out here. New 6.5 power valve that came with the kit (however the old one was a 7.5). Didn't change the jets, but forgot to look and see what size they were.

First attempt, the car started pretty quickly but needed lots of throttle to stay running - wouldn't idle. It was also very rich, filled my garage with dark smoke. This time, the throttle plates on the front outboard were soaked with fuel. It wasn't a float issue, because the car hadn't been running long enough to even fill the bowls.

Removed the carbs again to double-check my work. Blew out all the passages, paying special attention to the air bleeds. I also confirmed that I didn't put on any gaskets backwards, etc. Pulled the dipstick (should've done this at the get-go) and sure enough, oil smelled like gas. Changed the oil/filter.

Second attempt, same as the first.

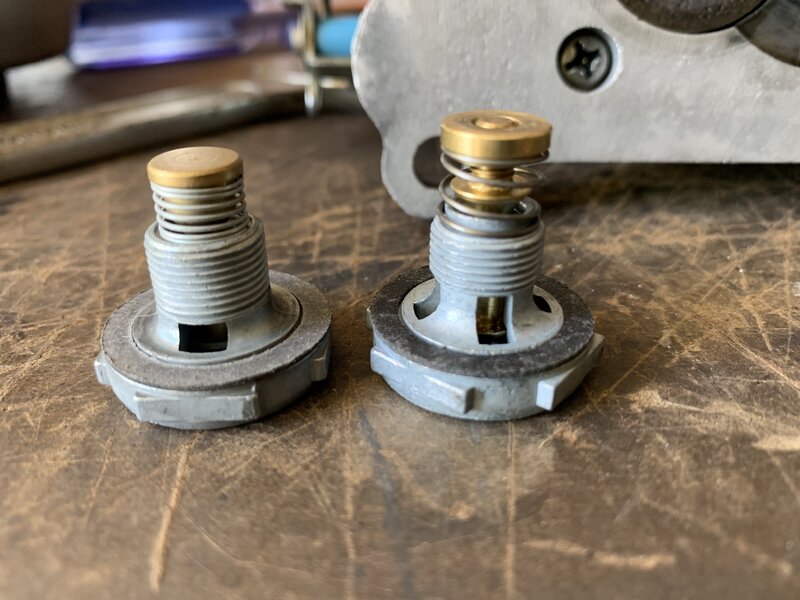
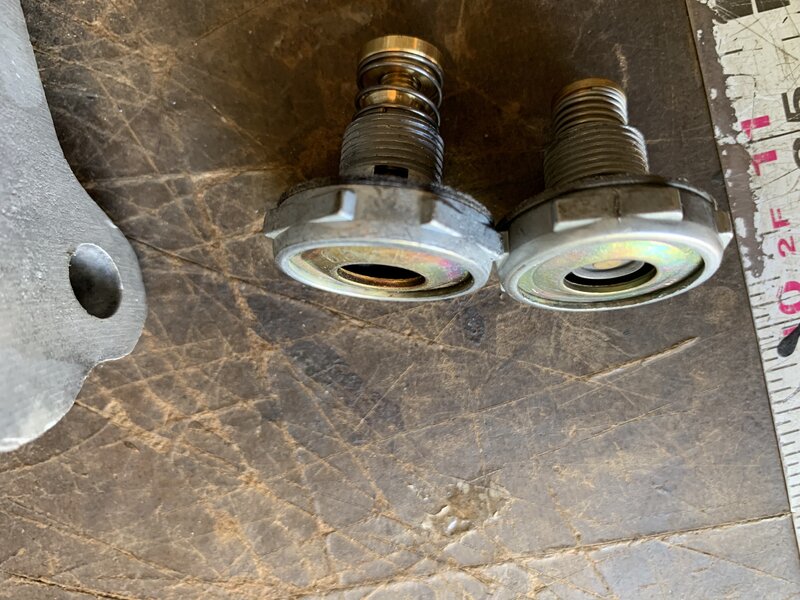
I thought maybe the new carb to intake gaskets were incorrect, so I replaced the new with the old ones, and I also noticed that I had forgotten to screw out the idle mixture screws. So I turned them out 1.5 turns. I also installed a fuel pressure regulator due to my suspicion that the carter high performance mechanical pump might be pushing too much pressure.

Third attempt, won't start at all. I started to smell fuel, so I looked under the car and saw small puddles of gas under the open headers. Coil wire is attached, ignition is on. I have a feeling it's something very simple that I either missed or am doing wrong, or even the wrong rebuild kit was used. My carbs are original to the engine (1969), and I've read that Holley changed the center carb metering plate gasket over the years. I plan to contact Holley to see if they can help, but I thought I'd also reach out to the brain trust here as well.
 

70chall440

Well-Known Member
Joined
Dec 11, 2010
Messages
1,260
Reaction score
979
Location
Western Washington
There is a lot going on with any 6 pack system but in the end they are just carbs. Many people do no understand that the end carbs do provide some airflow and fuel during idle.

I'd strongly recommend reviewing the FSM, but here is my advice for whatever it is worth.

1. make sure you do not have any vacuum leaks
2. ensure the float levels are set correctly
3. check the outboard butterfly positions, they need to be open slightly
4. run the idle mixture screws in and then back them out 1 turn

In my experience 6 pack equipped cars tend to be a bit problematic getting running from a dry state; there is a fine line between not enough and flooded. Also, timing can play a significant role in all this, if it is not right it just makes the problem worse.

I am sure someone with better instructions will come on here, I've owned a few 6 pack cars over the years and back in the day when I was driving them daily they were not an issue but in modern times when the cars don't get driven frequently they can be a bear. This is why I converted my Challenger and Cuda to EFI 6 pack.
 

rklein71

Well-Known Member
Joined
Feb 27, 2015
Messages
1,159
Reaction score
524
Location
Amarillo Texas
You might check fuel pressure, if I remember right, more than around 6 pounds of pressure and your needle and seats won't handle it.
 

moparleo

Well-Known Member
Joined
Oct 17, 2011
Messages
6,939
Reaction score
1,727
Location
So. Cal. Riverside area Moreno Valley
I agree the the FSM is your best friend. Rebuilding and tuning multiple carbs is not like changing your oil.
It is best to know your limitations and not be afraid to admit it. If you can't find someone local with carb knowledge, read all the info available in print and online.
Fuel washing the cylinder bores and bearings can get expensive. Your fuel bowls should be full BEFORE you attempt to start the engine. Fill them through the vents. This prevents excessive engine cranking to fill the bowls.
As said before timing is also critical.
Simple in theory but a lot going on. Always read instructions fully and more then once. Details are sometimes missed. Most problems regardless of mechanical system turn out to be something basic/simple. Never assume something is correct. Always verify.
Always start at the beginning so as not to miss anything.
Take your time. If you get frustrated, just walk away for a while. It will be there when you are in a better frame of mind and less likely to make a mistake.
When you are done, enjoy it !
 

Righty Tighty

Well-Known Member
Joined
Mar 4, 2021
Messages
305
Reaction score
116
Location
Sahuarita, AZ
Thanks everyone! I'll be the first to admit that I'm very new to carb tuning, definitely still learning. I've got a book on six packs that's very helpful, and I'll be downloading the FSM asap.

I thought about fuel pressure, so I installed a regulator that's preset at 6 psi, but still had the problem. I don't think timing is a problem here, because there didn't seem to be a problem with timing prior to rebuilding the carbs. I didn't think to fill the bowls prior to starting the engine, so that's something I will do.
 

Righty Tighty

Well-Known Member
Joined
Mar 4, 2021
Messages
305
Reaction score
116
Location
Sahuarita, AZ
I removed the carbs for another look, and noticed that I had somehow doubled up on the power valve gasket. I also noticed that the replacement power valve is vastly different from the old one. Is this an issue?
 

Attachments

  • 1EB31E25-CA55-4CFF-B0DB-6E2CB2132886.jpeg
    1EB31E25-CA55-4CFF-B0DB-6E2CB2132886.jpeg
    784.7 KB · Views: 182
  • F859C3AB-9602-426A-9198-2F333DBC45D5.jpeg
    F859C3AB-9602-426A-9198-2F333DBC45D5.jpeg
    1 MB · Views: 194
  • 70918DED-B2DD-40CC-9B2D-7D3C42E9C42D.jpeg
    70918DED-B2DD-40CC-9B2D-7D3C42E9C42D.jpeg
    784.7 KB · Views: 173

Chryco Psycho

Well-Known Member
Joined
Dec 28, 2008
Messages
4,453
Reaction score
2,098
Location
Panama
The gasket tends to split apart & become 2 when tightened , at least the gaskets made now do , the right power valave is the higher flow ones which are std replacement ones they work better
 

Righty Tighty

Well-Known Member
Joined
Mar 4, 2021
Messages
305
Reaction score
116
Location
Sahuarita, AZ
I did think of the gasket splitting, but usually you can see some torn fibers or some evidence of it splitting. It does make sense that it split, because I don’t recall the kit having “extras.”

Regarding the power valve, if it’s a higher flow valve, wouldn’t that cause a richer running condition like I’m seeing? Or do I not understand how it works?
 

Racer Dave

Well-Known Member
Joined
Jan 21, 2020
Messages
50
Reaction score
61
You don't understand how it works :)
Just kidding, but here's the deal: a 6.5 power valve opens any time the manifold vacuum drops below 6.5 in/Hg and adds extra fuel to the A/F mixture, up to the equivalent of 8 jet sizes! At idle, intake vacuum should be much higher than 6.5 so the PV should not be open. When manifold vacuum drops at WOT or at higher rpm the PV enriches the fuel mix to meet the demand.

I'm a little suspicious there may be a vacuum leak that is keeping your manifold vacuum below what it should be and opening the power valve too soon. I'd check for that. And there's always the possibility the PV itself is leaking.
 
Last edited:

Righty Tighty

Well-Known Member
Joined
Mar 4, 2021
Messages
305
Reaction score
116
Location
Sahuarita, AZ
Oh man, that’s an awesome explanation, thanks! I regret not checking the vacuum when the car was running, because I have no idea how much it was pulling at idle.

I’ll check for a vacuum leak tomorrow. Incidentally, I removed the carbs yesterday and found a split plug over the vacuum port where the PCV hose should go. (Previous owner deleted the PCV system, I’m going to reinstall it.) It’s possible I caused the split while rooting around down there, but it’s also possible it was torn before and causing a vacuum leak.
 

fasjac

Well-Known Member
Joined
Dec 27, 2019
Messages
2,249
Reaction score
1,131
Location
Arkansas
All good stuff, defiantly check for vacuum leaks, I like the blue gaskets myself. You have to know what vacuum your making before picking the PV. And might as well find out what jets are in em too. Follow the book and these guys and you’ll get it.
 
Last edited:

moparleo

Well-Known Member
Joined
Oct 17, 2011
Messages
6,939
Reaction score
1,727
Location
So. Cal. Riverside area Moreno Valley
You are going about it the correct way. Start from scratch and recheck everything. When \checking for vacuum leaks on top of the engine, do not use carb spray or similar flammables. You are only looking for an rpm change when you find the leak. A safer way is with a spray bottle of water.
 

Righty Tighty

Well-Known Member
Joined
Mar 4, 2021
Messages
305
Reaction score
116
Location
Sahuarita, AZ
Okay, I think I'm on to something. I read the entire chapter on carburetion in my 6 pack book, and have been making my way through Harold Demes's videos on YouTube. In the video I provided the link for, around 12:30 into it, he describes the vacuum chamber behind the power valve, and how raw, unmetered fuel will leak into it if the metering block is leaking. When I pulled the carbs yesterday, I noticed that chamber was 100% full of gas. I think I have a leaky metering block.


Attachments

  • B9111A84-9FB1-43F5-B1E8-31A2A3FD62BF.jpeg
    B9111A84-9FB1-43F5-B1E8-31A2A3FD62BF.jpeg
    45.3 KB · Views: 160

Righty Tighty

Well-Known Member
Joined
Mar 4, 2021
Messages
305
Reaction score
116
Location
Sahuarita, AZ
Quick update - I removed the carbs and tested them with the bench pressure tester I made from Harold Demes's videos. Both outboards began pouring out gas from the idle screws and transition slots before even 1 psi was hit. I tested the center carb alone and it was fine. Set the float level and tested the needle and seat to 6.5 psi - held fine.
a52tTPfuRgyMCUntT8nP9Q.jpg


So, I made a couple gasket sandwiches with two gaskets as the bread and beer can material as the meat. Duct taped for good measure. I installed them on the outboard sides and secured with the base plates from the outboards, then installed the center carb. The engine lit off quicker than it ever has for me, and idled wonderfully! Now, at least I can move the car around on just the center carb while I rebuild the outboard carbs.
vT6wweEzRWS%yA0jQoterA.jpg


Huge thanks to everyone who has helped so far, and I will update ASAP. I'm going to check the metering plates for flatness while I'm waiting for the correct rebuild kit.
 

Mastertech

Active Member
Joined
Apr 26, 2018
Messages
26
Reaction score
18
Holley uses a brass float for the center carb but uses nitrophyl floats on the outboard carbs. Over time they start to absorb fuel and become heavier making it very difficult to control fuel flow. I replace all nitrophyl floats every time I rebuild a carb with them. This includes Rochester and Carter carbs as well. You can also get a wear spot on any float where the needle rubs against the float tab that can also cause sticking problems. Do you know if the camshaft is the stock grind or has it been replaced with a more aggressive one? This can greatly affect which power valve to use. Once you have it running again check vacuum at idle, at 2100 rpm and again at a steady cruise at 60mph and watch when climbing a slight grade such as an on ramp and using just enough throttle to maintain a steady speed. If the vacuum drops lower than the power valve rating you will need to go to one with a lower rating. It has been my experience that a 6.5 works well for most applications with stock to middle performance cams but really aggressive cams will need a lower one.
 

ctaarman

Well-Known Member
Joined
Nov 8, 2016
Messages
105
Reaction score
24
Quick update - I removed the carbs and tested them with the bench pressure tester I made from Harold Demes's videos. Both outboards began pouring out gas from the idle screws and transition slots before even 1 psi was hit. I tested the center carb alone and it was fine. Set the float level and tested the needle and seat to 6.5 psi - held fine.View attachment 82959

So, I made a couple gasket sandwiches with two gaskets as the bread and beer can material as the meat. Duct taped for good measure. I installed them on the outboard sides and secured with the base plates from the outboards, then installed the center carb. The engine lit off quicker than it ever has for me, and idled wonderfully! Now, at least I can move the car around on just the center carb while I rebuild the outboard carbs.View attachment 82960

Huge thanks to everyone who has helped so far, and I will update ASAP. I'm going to check the metering plates for flatness while I'm waiting for the correct rebuild kit.
RT, would you kindly tell me which Demes video has the instructions for the bench pressure tester? That's a new one on me and a great idea. Also as a reminder, those sparkplugs may need cleaning after that rich fuel,and the best way to do it withoit risking damage to the porcelain is to burn it off with a small propane torch, just getting the tip to show very slight sign of red.
 

Righty Tighty

Well-Known Member
Joined
Mar 4, 2021
Messages
305
Reaction score
116
Location
Sahuarita, AZ
@Mastertech Thanks a bunch! Unfortunately, I don't have the cam card or any real specifics on the engine. I can tell by the lope that the cam is definitely a bit more aggressive than a street cam. I'm ashamed to say that I didn't measure vacuum prior, but I will now. I put the 7.5 back in just to get it running (partially because I thought the 6.5 might've been bad), but that's neither here nor there.

@ctaarman Here's the video. It was incredibly easy and cheap.

Thanks for the tips regarding cleaning the plugs. I was unsure with the originals, so I replaced them with new, but also kept the old ones because I wasn't sure how to clean them.
 

Mastertech

Active Member
Joined
Apr 26, 2018
Messages
26
Reaction score
18
While checking for warped parts did you put a straight edge across the body of the carb? A six inch caliper is good for this. Check both across from side to side and corner to corner. Over time the bowl screws can cause the carb body to warp causing both fuel and vacuum leaks. The only way to fix this to replace the body.
Once you have your leaks fixed we the move onto lumpy cam tuning.
All mixture adjustments are done with the PCV valve out of the valve cover drawing fresh air.

If your vacuum at idle is below 15 inches you may have a problem with getting the engine to idle by having to open the throttle plates to much and then pulling from the transfer slots. This gives you a rich mixture that you cannot control with the mixture screws. If you look at the throttle plates you will see a small hole drilled into them. These holes allow some air to bypass the plates allowing them to stay almost closed to prevent pull over from the slots. On the underside of the throttle body is a throttle stop screw that allows you to set the position of the plates at idle. On the outboard carbs try setting the plates at 1/4 to 1/2 turn from fully seated but no more than this. For the center carb we are now into the trial part, starting with a 1/8 inch hole drilled in the plates and looking for an improvement in mixture control, idle quality and vacuum. If you see an increase in idle rpm you should be able to turn the idle speed screw out to get the idle speed to a reasonable speed. If you can now turn in the idle mixture screws in and cause the engine to misfire great. If not repeat by increasing the holes by one drill size and try again. You may have to do this two or three times. Once the mixture screws become responsive turn each screw in slowly to find the misfire spot then out 1/2 turn. Go back and forth between the screws two or three times and you will find the precise point of misfire to back out each screw the 1/2 turn. Now plug the PCV valve back into the valve cover and let the engine idle for a few minutes, the set your final idle speed. The exact idle rpm is tricky as a lumpy cam may not idle at the factory rpm at all but hopefully you can get it to within a couple hundred rpm.

One example of a crazy wild cam I will never forget was a 350 chevy that came into the shop with dual 4bbls on a cross ram intake, 11 1/2 to one compression with an idle vacuum that fluctuated between 4 and 6 inches. The engine would sort of idle at 1350 rpm with the front fenders shaking bake and forth several inches. If you turned the idle down to 1300 it would stall. Very silly for a street driven car but from 3500 rpm to 8500 all hell broke loose.

Good luck,
Terry
 

Righty Tighty

Well-Known Member
Joined
Mar 4, 2021
Messages
305
Reaction score
116
Location
Sahuarita, AZ
While checking for warped parts did you put a straight edge across the body of the carb? A six inch caliper is good for this. Check both across from side to side and corner to corner. Over time the bowl screws can cause the carb body to warp causing both fuel and vacuum leaks. The only way to fix this to replace the body.
Once you have your leaks fixed we the move onto lumpy cam tuning.
All mixture adjustments are done with the PCV valve out of the valve cover drawing fresh air.

If your vacuum at idle is below 15 inches you may have a problem with getting the engine to idle by having to open the throttle plates to much and then pulling from the transfer slots. This gives you a rich mixture that you cannot control with the mixture screws. If you look at the throttle plates you will see a small hole drilled into them. These holes allow some air to bypass the plates allowing them to stay almost closed to prevent pull over from the slots. On the underside of the throttle body is a throttle stop screw that allows you to set the position of the plates at idle. On the outboard carbs try setting the plates at 1/4 to 1/2 turn from fully seated but no more than this. For the center carb we are now into the trial part, starting with a 1/8 inch hole drilled in the plates and looking for an improvement in mixture control, idle quality and vacuum. If you see an increase in idle rpm you should be able to turn the idle speed screw out to get the idle speed to a reasonable speed. If you can now turn in the idle mixture screws in and cause the engine to misfire great. If not repeat by increasing the holes by one drill size and try again. You may have to do this two or three times. Once the mixture screws become responsive turn each screw in slowly to find the misfire spot then out 1/2 turn. Go back and forth between the screws two or three times and you will find the precise point of misfire to back out each screw the 1/2 turn. Now plug the PCV valve back into the valve cover and let the engine idle for a few minutes, the set your final idle speed. The exact idle rpm is tricky as a lumpy cam may not idle at the factory rpm at all but hopefully you can get it to within a couple hundred rpm.

One example of a crazy wild cam I will never forget was a 350 chevy that came into the shop with dual 4bbls on a cross ram intake, 11 1/2 to one compression with an idle vacuum that fluctuated between 4 and 6 inches. The engine would sort of idle at 1350 rpm with the front fenders shaking bake and forth several inches. If you turned the idle down to 1300 it would stall. Very silly for a street driven car but from 3500 rpm to 8500 all hell broke loose.

Good luck,
Terry
Thanks Terry for the thorough tutorial. I'll refer back to this once I'm at the tuning stage. I haven't had time to pull the outboards apart yet, but I will certainly check for flatness on the body. I've seen folks mill about .005" to resurface a warped body - is that not a good idea?
 

Mastertech

Active Member
Joined
Apr 26, 2018
Messages
26
Reaction score
18
.005" should be no problem. I have seen holley bodies warp more than .020". Makes them impossible to stop leaking. Keep me posted on how you are making out.
Terry
 
Back
Top