• Welcome to For E Bodies Only !

    We are a community of Plymouth Cuda and Dodge Challenger owners. Join now! Its Free!

Thus it begins

thestuntboy

Active Member
Joined
Oct 19, 2019
Messages
41
Reaction score
16
Location
N.E. CT
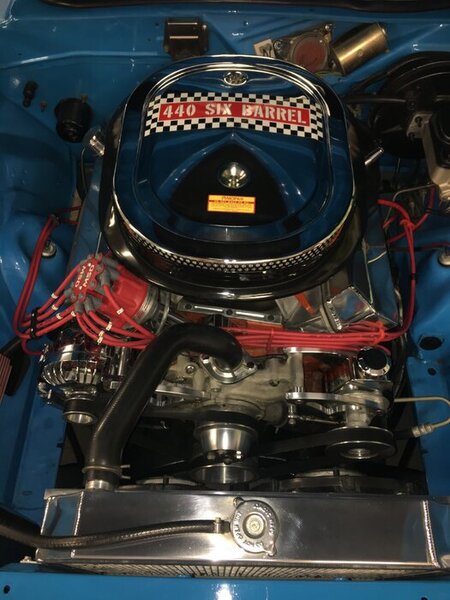
Starting the engine install the hard way. The wife helps but just an extra set of eyes mostly. Its in now but have to separate the engine and transmission so I can install the headers. First try I could not get engine high enough with transmission attached to mount them. I could follow the instructions but where is the fun in that.

P.S. I always do it the hard way and yes I heard you roll your eyes.:lol:

Cuda engine install 2.jpeg


Cuda engine install.jpeg
 

budascuda

Well-Known Member
Joined
Jun 17, 2017
Messages
1,104
Reaction score
567
But if you damage the paint, there will be no going back! You would have to do a lot more work, no?
 

thestuntboy

Active Member
Joined
Oct 19, 2019
Messages
41
Reaction score
16
Location
N.E. CT
Told you I could hear your eyes roll:rofl:. I use blankets on other peoples vehicles or a quick removal . In the over a hundred installs for me I have never had a problem without them, if you want to and have them that's ok but I usually don't. I know russian roulette.
I now have to fit the headers after securing the transmission then the real fun begins. Decide pulley system (probably stock $$) then install complete Ron Francis wiring harness. I put new leaf springs in the rear and I don't like how low the car is sitting in the rear so I will probably revisit that.
 

thestuntboy

Active Member
Joined
Oct 19, 2019
Messages
41
Reaction score
16
Location
N.E. CT
I am still working the engine right now but I looked at it closer this morning and it looks like I was so used to the super stock springs someone had put on in a previous life I wasn't used to seeing it level. I will worry about it later once I get her on flat ground.
 

thestuntboy

Active Member
Joined
Oct 19, 2019
Messages
41
Reaction score
16
Location
N.E. CT
Headers in. Right side was easy and corkscrewed right in with engine lifted after pinning the rear of the transmission. The first and last mount hole were shaky so retapped next size up, I will be replacing the heads in the future but they locked right up. The driver side had to come up from underneath and have to be loose to install the starter. Stock stater fit after a wrestling match and is cocooned by the header so in the future if/when needed a mini torque would be better choice from a heat soak perspective. Now the tedious bracket matching , cleaning, painting, mounting so the alternator/power steering and pulleys can go on. Once alternator is in I will begin the wiring process which will take a while.

Engine 1.jpg


Engine 2.jpg


Engine 3.jpg


Engine 4.jpg


Engine 5.jpg


Engine 6.jpg


Engine 7.jpg


Engine 8.jpg


Engine 9.jpg
 

thestuntboy

Active Member
Joined
Oct 19, 2019
Messages
41
Reaction score
16
Location
N.E. CT
Decided to quit screwing around with the brackets and installed a set of March brackets. Cleaner looking and closer tolerances and adjustability. Still wiring as my limited intellect allows and other projects allow.
20200928_163623.jpg
20200928_163629.jpg
 

fasjac

Well-Known Member
Joined
Dec 27, 2019
Messages
2,237
Reaction score
1,126
Location
Arkansas
As Cudahunter says, clean brackets if I may say so. Nice choice. Nice project!!
 

Attachments

  • CB2DA21F-345F-4CF7-B578-5BD9727BA203.jpeg
    CB2DA21F-345F-4CF7-B578-5BD9727BA203.jpeg
    58.2 KB · Views: 200

thestuntboy

Active Member
Joined
Oct 19, 2019
Messages
41
Reaction score
16
Location
N.E. CT
Ok after a tree hit my house, health issues and supplier backorders I am back on this. I will have some more pictures to come soon but the wiring is starting to make sense. Biggest issue I have is trying to mate the original hardware with an aftermarket setup. Original wiring relied on relays and voltage delimiters and other tie ins the aftermarket doesn't account for or need. Fortunately I am running Autometer gauges so the gauge cluster setup is greatly simplified as they use a straight 12v setup. Engine mgt and fusebox is aftermarket but I am running original front and rear lighting harness. Once I have the fuse box wired I can route to harnesses and cut to fit. Greatest snag for me (brainfart moment) was my distributor didn't want the ECU and this stumped me for a week on how to run some wires until I realized the instructions had a note for aftermarket distributor setup Doh!!!!!! Wiring steering column now with new ignition and turn signal harness so I can go for initial engine start.
 

moparleo

Well-Known Member
Joined
Oct 17, 2011
Messages
6,926
Reaction score
1,708
Location
So. Cal. Riverside area Moreno Valley
Just a minor observation and just an FYI for other members. Best to use studs n the outer exhaust manifold bolts for a couple of reasons.
#1 coolant leaks. The outer holes in the head go into the water jackets and the studs ( or bolts f you use them) need to have the proper thread sealer.

#2 It is easier to install your headers in that you can hang the gaskets and headers on the studs while you line up and install the other bolts.
#3 Doug's Headers are nice but my TTI"s did not need all this fuss to install. JMO
 
Last edited:

thestuntboy

Active Member
Joined
Oct 19, 2019
Messages
41
Reaction score
16
Location
N.E. CT
Just a minor observation and just an FYI for other members. Best to use studs n the outer exhaust manifold bolts for a couple of reasons.
#1 coolant leaks. The outer holes in the head go into the water jackets and the studs ( or bolts f you use them) need to have the proper thread sealer.

#2 It is easier to install your headers in that you can hang the gaskets and headers on the studs while you line up and install the other bolts.
#3 Doug's Headers are nice but my TTI"s did need all this fuss to install. JMO

The headers are mounted for routing purposes right now. I have not finalized the attachment thereof. TTI are nice but is also a personal choice. To spare the my way or else bloodbath these are the headers I am using for now until I can go from resurrection grade to performance grade.
 

thestuntboy

Active Member
Joined
Oct 19, 2019
Messages
41
Reaction score
16
Location
N.E. CT
Some more wiring cleanup and routing. Engine ignition is done except for switch. I am replacing the steering column wiring now with new everything. The ignition switch was R/R no changes but the turn signal harness is for a 1971 even though package says 70 E-body, I guess everyone knew but me. I removed the buzzer switch for key left in ignition because I don't need/want it. I of course saved it with the old turn signal harness for future consideration.
 

Attachments

  • 20211001_114720.jpg
    20211001_114720.jpg
    1.3 MB · Views: 118
  • 20211001_114731.jpg
    20211001_114731.jpg
    1.2 MB · Views: 131
  • 20211001_114829.jpg
    20211001_114829.jpg
    509.1 KB · Views: 117
  • 20211001_114908.jpg
    20211001_114908.jpg
    1 MB · Views: 127
  • 20211001_115839.jpg
    20211001_115839.jpg
    1.3 MB · Views: 128
  • 20211001_121537.jpg
    20211001_121537.jpg
    1.3 MB · Views: 122
  • 20211001_121739.jpg
    20211001_121739.jpg
    885.6 KB · Views: 120

70chall440

Well-Known Member
Joined
Dec 11, 2010
Messages
1,260
Reaction score
975
Location
Western Washington
I always heard how great TTI headers were and thought that they were just too expensive, well I finally bought a set for my 73 Cuda project and I was/am amazed at how well they fit and how easy they went in. By far the best fitting headers I have ever used or installed. I just bought another set for my 71 Charger project.
 

thestuntboy

Active Member
Joined
Oct 19, 2019
Messages
41
Reaction score
16
Location
N.E. CT
Still wiring individual wires and setting up my gauge cluster. I have to clean the trunk then tail harness goes in. Gas tank replacement tomorrow, starting to race the weather.
 

thestuntboy

Active Member
Joined
Oct 19, 2019
Messages
41
Reaction score
16
Location
N.E. CT
Pulled the fuel tank. Outside wasn't to bad except for sender area, internally though it didn't look good. Replacing everything.
 

Attachments

  • 20211020_134234.jpg
    20211020_134234.jpg
    1.5 MB · Views: 125
  • 20211020_134702.jpg
    20211020_134702.jpg
    1.3 MB · Views: 120
  • sender unit.jpg
    sender unit.jpg
    1.6 MB · Views: 126
Back
Top