• Welcome to For E Bodies Only !

    We are a community of Plymouth Cuda and Dodge Challenger owners. Join now! Its Free!

74 Cuda Restroration - From Below the Bondo to Daily Driver

rklein71

Well-Known Member
Joined
Feb 27, 2015
Messages
1,159
Reaction score
524
Location
Amarillo Texas
You say you are a big buy, just wait until you have to crawl in the trunk to weld. I wish I had welding goggles to weld with as the welding helmet was a big pain.
 

rklein71

Well-Known Member
Joined
Feb 27, 2015
Messages
1,159
Reaction score
524
Location
Amarillo Texas
One of my in progress pics on my 71.
 

Attachments

  • IMG_3271.JPG
    IMG_3271.JPG
    717.9 KB · Views: 168

heminut

Well-Known Member
Joined
Dec 28, 2008
Messages
719
Reaction score
554
Location
Deming, New Mexico
You say you are a big buy, just wait until you have to crawl in the trunk to weld. I wish I had welding goggles to weld with as the welding helmet was a big pain.
Boy, isn't that the truth! I'm 6"4" and at the time 235 lbs., and when I replaced the filler panel between the trunk lid and back glass on my Cuda I had to have my 5'8" best friend come over and do the spot welds in the trunk!:p
 

Zell

Well-Known Member
Joined
Jun 14, 2017
Messages
81
Reaction score
40
Thanks @heminut :cool: 
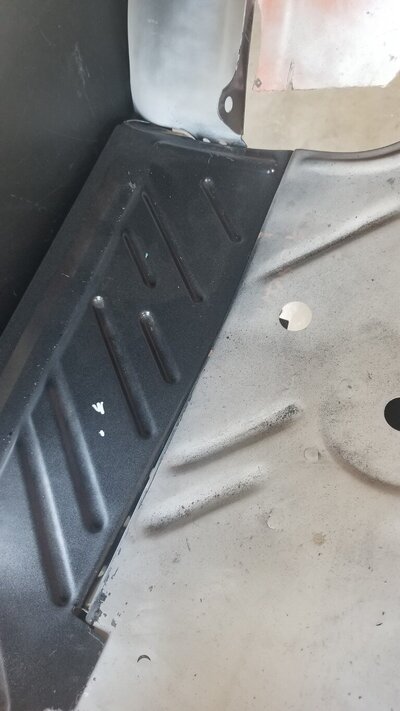
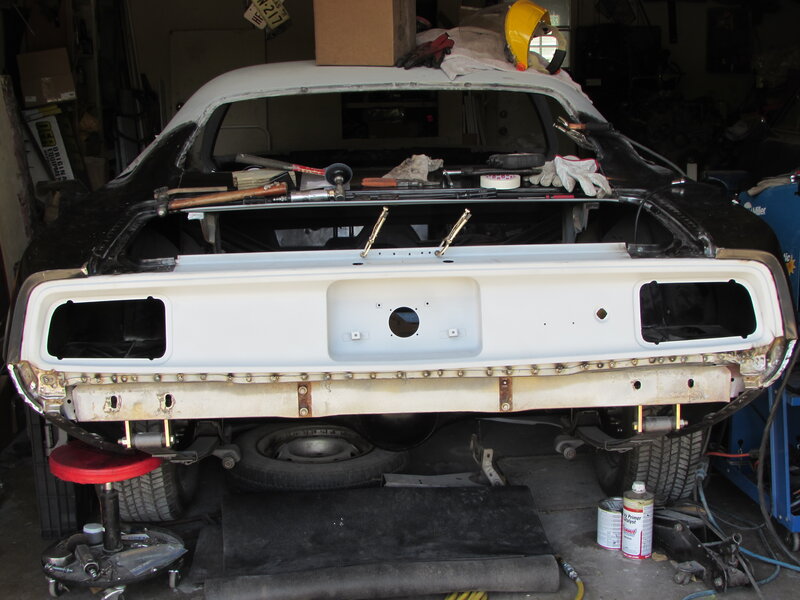
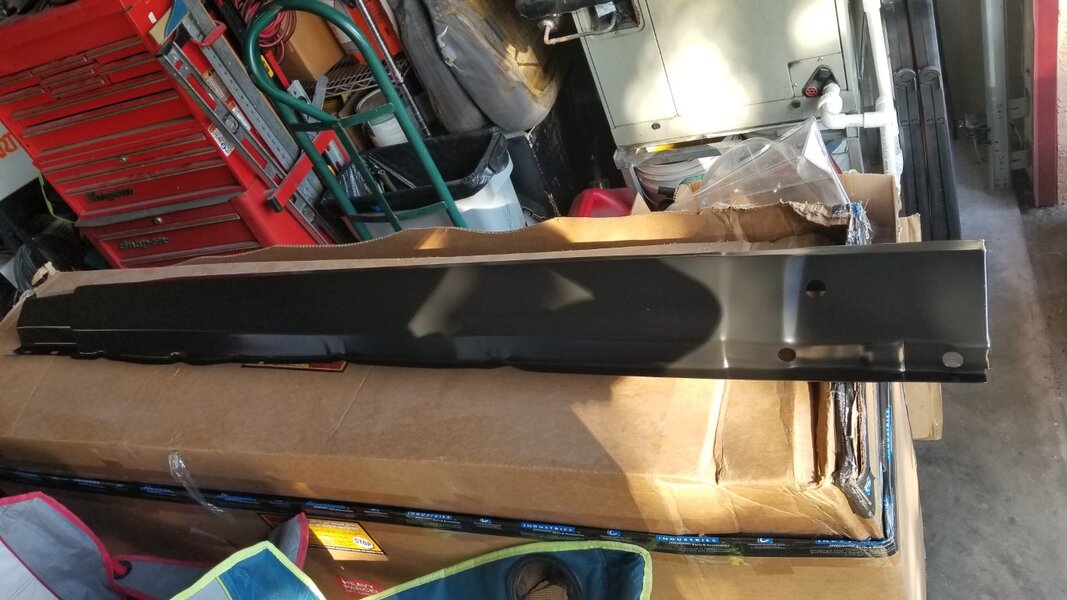
one side down, one more to go.

@rklein71 awesome progress on your Cuda. I thought about putting the entire rear quarters in as it looks like you did but I just below the window lines instead.

I had to crawl around the trunk when I replaced the entire trunk floor pan. I was twisted in all sorts of positions and I felt it for a few days after 😂 I'm not looking forward to the rear panel behind the window for that reason... But it feels damn good when I crawl out at see those finished welds.
 

Zell

Well-Known Member
Joined
Jun 14, 2017
Messages
81
Reaction score
40
Back with an update - the driver rocker panel I ordered is finally back in stock and arrived! Under the paint, the old rocker panel was rusted out and pitted, the back section had been patched previously and it needed some work.

Patch on the rear of the rocker.
20211227_104609.jpg

Front of the rocker.
20211228_141151.jpg

Spot welds were drilled out and the panel was cut out in a few pieces.
20211228_205024.jpg

I wasn't able to remove the flange and part of the rocker underneath the sides. I cut around them and trimmed the flange off the new rocker panel.

20211228_205024.jpg

20211229_161340.jpg

Checking the fit of the new sides with a test fit.
20211229_161351.jpg

The outer rocker was remove to drill the holes, etc. for welding. I decided while the rocker was open to spray the inside with epoxy primer to help seal it and prevent future rust.

20211229_202721.jpg
 

Attachments

  • 20211229_171352.jpg
    20211229_171352.jpg
    87.2 KB · Views: 144
  • 20211227_141824.jpg
    20211227_141824.jpg
    82.1 KB · Views: 123
  • 20211227_114320.jpg
    20211227_114320.jpg
    99.8 KB · Views: 130
  • 20211227_093533.jpg
    20211227_093533.jpg
    119.1 KB · Views: 138

Zell

Well-Known Member
Joined
Jun 14, 2017
Messages
81
Reaction score
40
Hi all - update that the rocker is in. Next up I'll be putting in the outer wheelhouse, floor extension, and rear quarter.

Final alignment and clamping in place. The bottom lip was hanging low so with the top clamped into place I used a car jack to push the bottom lip into place then clamped it. The AMD panel fit like a glove.
20220101_110939.jpg

Rocker welded in and covered in epoxy primer. I'll take care of the grinding later as I will have to go around the car and grind/level the body panels.
20220101_161207.jpg
 

70chall440

Well-Known Member
Joined
Dec 11, 2010
Messages
1,260
Reaction score
979
Location
Western Washington
Awesome work, you might want to turn up the heat on your welder. From the pictures the weld beads are stacking/building up which is normally a sign that the weld is cold. Turn it up, start the weld in the center of the hole and relatively quickly make a little circle (takes some practice) and you will get what looks like a spot weld. When welding rusty metal (even surface rust) I like to start on the edge of the hole on new panel and pull the weld into the center and then make the circle. Doesn't always work but does more times than not.
 

Zell

Well-Known Member
Joined
Jun 14, 2017
Messages
81
Reaction score
40
Awesome work, you might want to turn up the heat on your welder. From the pictures the weld beads are stacking/building up which is normally a sign that the weld is cold. Turn it up, start the weld in the center of the hole and relatively quickly make a little circle (takes some practice) and you will get what looks like a spot weld. When welding rusty metal (even surface rust) I like to start on the edge of the hole on new panel and pull the weld into the center and then make the circle. Doesn't always work but does more times than not.
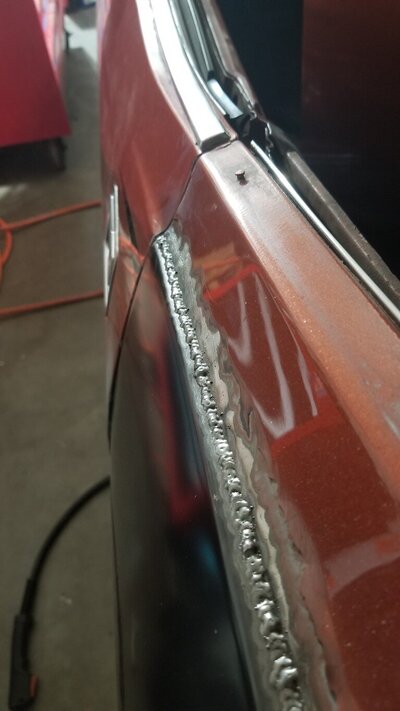
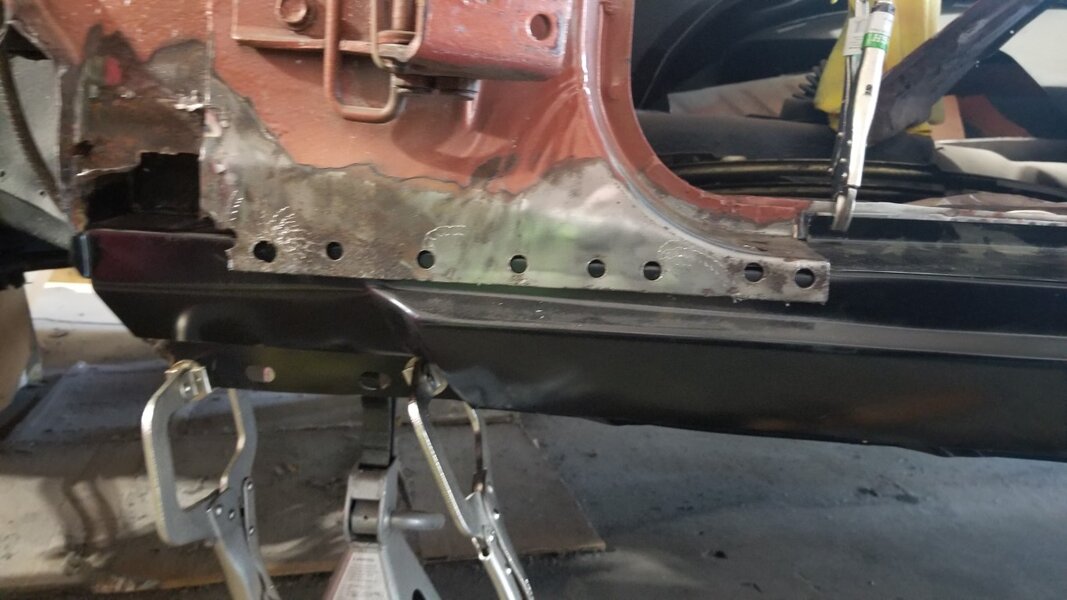
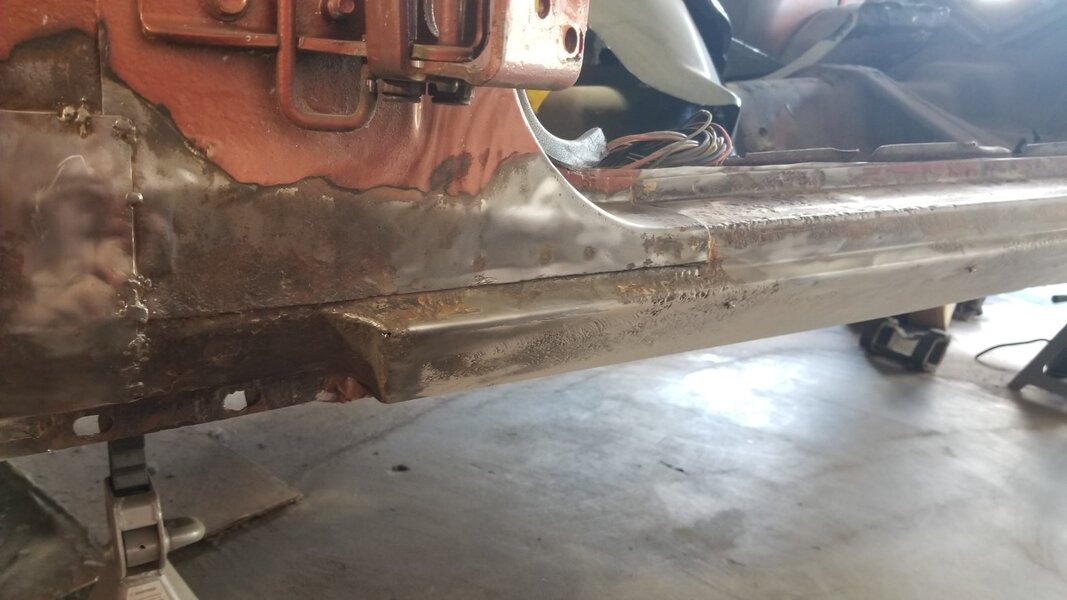
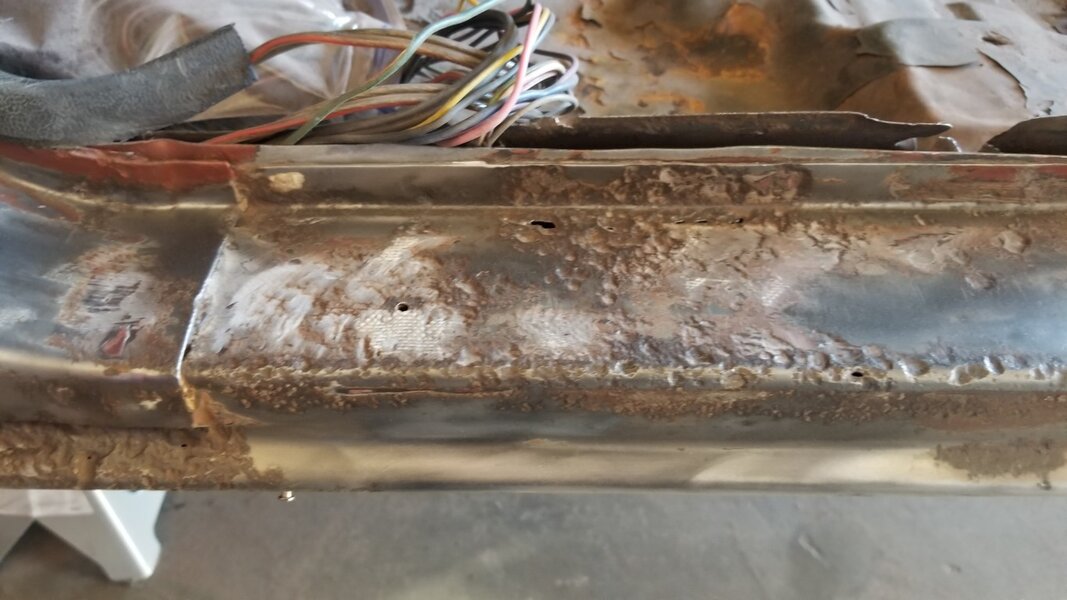
@70chall440 Good idea, thanks for the feedback. I've been trying to figure out how to get that spot weld look with the plug welds.

I usually start in the center and make small circles as I'm pushing the weld puddle out in the circular motion but as when it is just shy of the surface if the metal I am welding to I have a tendency to take a 'final pass circle'. (And I yell at myself for doing this every time LOL!)

Also, is it possible the wire speed is too fast? I'm using the simple chart on the inside of the welder for speed/heat.

I am determined to get the spot weld look by the end of this build hahaha!
 

70chall440

Well-Known Member
Joined
Dec 11, 2010
Messages
1,260
Reaction score
979
Location
Western Washington
Well the wire speed might be too slow for the speed of your movement, so you can slow it down or you can move faster. That said, you probably still need more heat. The problem as I am sure you have discovered is that when you up the heat when welding new panels on old metal is that you get blow throughs which suck. So, one way to counter this is to get some weld in the center using real short bursts or turning down the heat a little, then with some weld in there you can turn it up and burn it in. You might want to also turn up your regulator just a little to get more gas flow around the weld.

Welding on metal that has any rust is a pain as I know you have discovered. Even if you grind it there is still some rust in the rusted pits. I have found that if you wipe the rusty metal with some acetone after grinding it can help some.

Another technique is to burn it in as you have then hit the welds with a flap wheel and flatten them out, reweld where necessary and move on. You are doing great regardless.
 

Zell

Well-Known Member
Joined
Jun 14, 2017
Messages
81
Reaction score
40
@70chall440 that's super helpful, really appreciate it. And you are correct about the blow through issues with the heat. I've experenced it may times with older metal.

Even still I'm going to try turning the heat up and using the method you've suggested. My goal is to be able to get the factory spot weld look and not have to grind anything down when I'm done putting a piece in. 😎

Thanks for all the tips/support.
 

70chall440

Well-Known Member
Joined
Dec 11, 2010
Messages
1,260
Reaction score
979
Location
Western Washington
Every time I build a car I try very hard to make things look as if they came that way but I have to be honest and say that I am unsuccessful more than the other way. Its not all that hard to get the spot weld look when welding clean new metal to say a frame rail or thicker metal but when you are doing new sheet metal to old sheet metal it is VERY difficult and sometimes you just have to accept what you get. In other words, don't beat yourself up if you are not getting those nice flat spot weld looking welds, its good to strive for that but in many cases it just isn't going to happen.
 

Zell

Well-Known Member
Joined
Jun 14, 2017
Messages
81
Reaction score
40
Have you used a spot welder for any of the metal work you do? I was considering getting a spot welder for the next project :)lol:) if I need to replace something like the front cowl that has a ton of spot welds to the firewall.
 

Zell

Well-Known Member
Joined
Jun 14, 2017
Messages
81
Reaction score
40
Hi All,

Back with a few updates.

Custom lower bracket for the seatbelt mount.
20220226_115646.jpg

Seatbelt mount bolted to the rocker.
20220227_142822.jpg

Putting in the new outer wheelhouse.
20220305_160506.jpg

20220305_171018.jpg

20220417_133042.jpg

Prepping the quarter panel and checking the alignment to get the body lines.

20220305_150642.jpg

20220314_173200.jpg

Welding in the quarter.
20220417_172300.jpg
20220417_193737.jpg
20220417_193956.jpg

20220305_150642.jpg
 

Zell

Well-Known Member
Joined
Jun 14, 2017
Messages
81
Reaction score
40
The gap turned out very nicely without modification to the quarter this time.
20220417_212829.jpg

20220417_213504.jpg

The canned epoxy primer came in handy for following on the welding to prevent rust.

20220417_215623.jpg
 

Attachments

  • 20220422_172553.jpg
    20220422_172553.jpg
    120.8 KB · Views: 109
  • 20220417_213006.jpg
    20220417_213006.jpg
    88.3 KB · Views: 100

Zell

Well-Known Member
Joined
Jun 14, 2017
Messages
81
Reaction score
40
Update - the rotted out quarter and trunk gutter on the passenger side got replaced today:

Starting point - the gutter had several pitted rust spots and holes.
20220429_102935.jpg
The gutter and portion of the quarter with the holes was removed.
20220429_145626.jpg

The new gutter welded in along with the patch for the quarter.

20220429_194819.jpg
 

Attachments

  • 20220429_150651.jpg
    20220429_150651.jpg
    172.7 KB · Views: 95
  • 20220429_133018.jpg
    20220429_133018.jpg
    115.2 KB · Views: 99
  • 20220429_114109.jpg
    20220429_114109.jpg
    104 KB · Views: 102

Zell

Well-Known Member
Joined
Jun 14, 2017
Messages
81
Reaction score
40
Hi all, quick updates - the back is coming coming together.

Blending the new quarters to the original tail panel (before/after).

Driver quarter (the remaining hole was closed afterwards).
20220501_151156.jpg 20220501_152925.jpg

Passenger quarter.
20220513_120845.jpg 20220513_133915.jpg

Inner wheel well (now it lines up with the floor and trunk extension).
20220528_132420.jpg
20220529_132300.jpg

20220529_132353.jpg


20220530_122257.jpg
 
Back
Top