• Welcome to For E Bodies Only !

    We are a community of Plymouth Cuda and Dodge Challenger owners. Join now! Its Free!

My 70/72 'Cuda (re) build.

tklockwood

Well-Known Member
Joined
Dec 17, 2014
Messages
88
Reaction score
9
Location
Corcoran, MN
The Valentine update

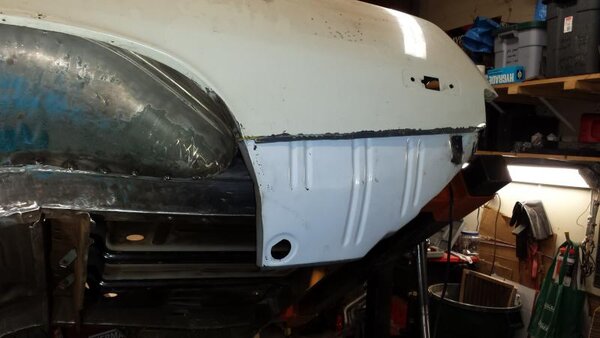
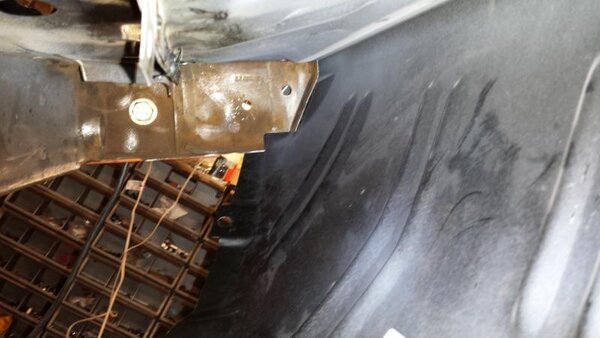
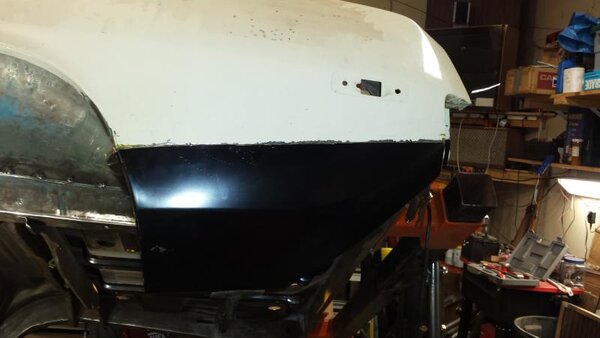
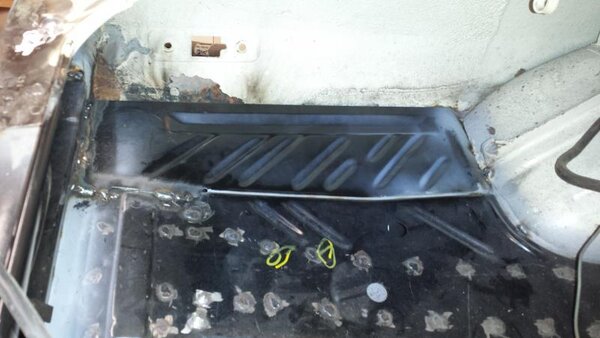
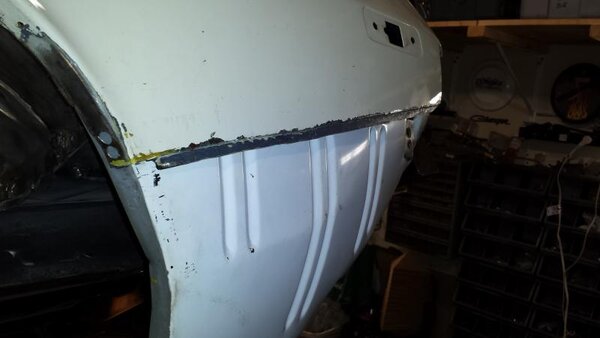
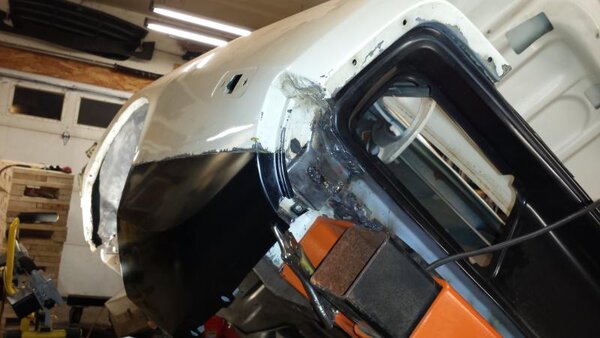
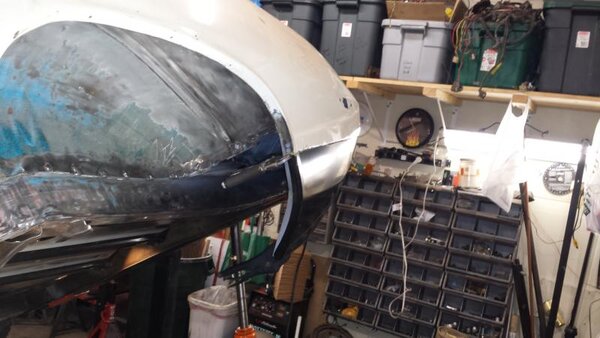
Actually Valentine's day sort of shortened my weekend and led to less work getting done. But I don't mind. Much. My friend Bob came over today and helped me get my driver side trunk extension positioned and welded in. My last update showed the old extension removed and the bottom of the quarter cut off. Before installing it I coated the areas to be welded with weld through primer. I also painted the part of the trunk extension that I won't be able to get to in the future.
2015-02-15 18.57.14.jpg2015-02-15 18.56.42.jpg
2015-02-15 18.56.52.jpg

I have the lower quarter panel flanged and the new piece trimmed very close to final before I weld it in. The weld line will end up below the trunk floor level and will not be visible from the trunk. I should be able to finish the fitment and start getting it welded in in the next couple of evenings... That's it for now.
2015-02-15 18.55.51.jpg2015-02-15 18.55.38.jpg
2015-02-15 18.55.30.jpg2015-02-15 18.55.09.jpg

2015-02-15 18.57.14.jpg


2015-02-15 18.56.52.jpg


2015-02-15 18.56.42.jpg


2015-02-15 18.55.51.jpg


2015-02-15 18.55.38.jpg


2015-02-15 18.55.30.jpg


2015-02-15 18.55.09.jpg
 

tklockwood

Well-Known Member
Joined
Dec 17, 2014
Messages
88
Reaction score
9
Location
Corcoran, MN
It has been forever since I posted an update on here. I have to admit the 'Cuda project was kind of idle for a lot of the summer but it is back in full swing. A lot of time, money, and energy was spent preparing my garage for a winter of 'Cuda work and it has definitely paid off. Instead of bad 120 volt power from the house I now have my own meter socket and service entrance. You can see the pole in the picture. It is literally 3 feet from the garage so at least it didn't mean a big dig. Well, not for that.

I also did dig a trench from the house and run direct burial cat5e cable from the house to the garage. I did put it in pvc conduit to protect it a little. Previously I was trying to use wifi from the house out to the garage. It was very unreliable in spite of numerous configuration changes and hardware changes. The cat5e has enabled a hard wired gigabit ethernet connection from the house network. What a difference. I have a Mac mini in my tv case out there so now I can do Pandora, Dish Anywhere, and Netflix all in my garage while I work.

I also picked up a used 12000 BTU aid conditioner for 40 bucks and installed it in my garage wall. It had an issue with it's thermo-couple that caused it to not cool the garage very well. It just didn't run the compressor. So I built a little box with a digital temperature display and a relay that allows me to control the power to the air conditioner by setting the temperature in the little digital interface. I jumpered around the non functional internal control so the compressor runs whenever there is power to it. And my relay setup controls the power. It actually works super slick, and only cost me like 20 bucks. So now in the summer I can pretty much freeze my garage with that thing. I love air conditioning.

Last winter I added a hanging heater with a dedicated propane tank for the garage. So now I have it all. Power, heat, Internet, and even air conditioning. I have no excuses.

This picture also shows my giant Mopar "M" on my garage. My wife surprised me with this for Christmas 2 years ago. It is 4 feet in diameter, powder coated steel. I bought the light specifically to light up the M. It makes me happy.

More to follow...


20773-b41813cb33a72a85169233aa68882d34.jpg


2015-07-27 17.17.08.jpg
 

tklockwood

Well-Known Member
Joined
Dec 17, 2014
Messages
88
Reaction score
9
Location
Corcoran, MN
In my last post I forgot to mention air. Compressed air. Lots of it. Now that I have 240 I also have a new air compressor. A squat little 80 gallon 3 cylinder I got at Menards. It is wonderful to have an unlimited supply of air. And now that I do, I hooked up my sand blast cabinet and tested it on my lower control arms.

20774-1c31ba13c9e1838f9c1c8ba0db92ee62.jpg

20775-e902f1757afcee97f691cf4742a226b2.jpg


Obviously this is in between blasting them. The sand blast cabinet is working well with the new compressor. I have since finished the other one and installed the lower control arm stiffening kit from P-S-T on both of them and sent them both out for powder coating. I am not a big fan of the "sea of black" suspension that I see a lot of people do so I had them done in a dark grey. I am quite happy with the result.
20776-9bf50bb6d66f958a37333e82a51db539.jpg

20777-7aa40eb97c0f3b9a1b89434084e2aa90.jpg


I have also ordered a bunch of new parts from Bergman Auto Craft. I am getting the QA1 K member and strut rods, The modern Borgeson power steering box and adapters, 1.05 torsion bars, upper control arms, and some other bits. I spent a lot of time considering my options and I finally settled on this configuration. I am looking for something with excellent street manners but good cornering ability as well. We shall see how well I have chosen my parts.

2016-01-04 20.48.41.jpg


2016-01-04 20.48.47.jpg


2016-01-29 13.05.29.jpg


2016-01-29 13.05.38.jpg
 

tklockwood

Well-Known Member
Joined
Dec 17, 2014
Messages
88
Reaction score
9
Location
Corcoran, MN
Part of this project from the beginning was always going to be remove the factory foot operated parking brake and install a center mounted hand brake. That is just how it should be in my opinion. My car will always have a manual transmission so a parking brake is very important. I do not plan to use a factory console because my first 'Cuda didn't have one and I just like it like that. But I will add a center arm rest of some sort because I plan to do some long drives and I will need a place to rest my arm.

I decided to use the chrome Lokar parking brake. I like the look and the universal nature of it. I bought the "under floor mount" version and started thinking. I decided to cut a piece of the tunnel out and make my own piece of floor shaped appropriately to hold the hand brake assembly under my new floor. (tangent warning)... Somewhere in here I started looking into options to add an overdrive. TKO600, T56, etc. I like the t56 idea but a little research revealed that I would have to really cut my floor up to fit it, including the torsion bar cross member. No. I don't think so. I considered the TKO, but I wasn't sure... Finally I called Gear Vendors. I had a nice conversation with them and when I was done I knew that was what I wanted. I love my hemi 4 speed. I just want an overdrive. But this meant I needed to make sure I preserved the space in the tunnel, right where I was going to put my hand brake.

So... I came up with a new plan. I closed the hole back up and added an angled exit from inside the car for the brake cable to go through. I also used a piece of angle iron to make a simple, but quite rugged mount for the hand brake.

20778-1875c3cacb33f2cad6ceaa24f522a494.jpg

20779-c3db4edcb1af26ac8d99e9355dd90f79.jpg

20780-de761650649214390ad3e6f9d984d0ed.jpg

This has given me back the space in the tunnel that was previously available so now my overdrive should fit with no issues. I bought what I am calling an "intermediate cable", a Dorman replacement part) that will run from the hand brake , through the floor, and connect to the dual cable bracket that Lokar (optionally) provides. Their bracket and cable assembly is quite large and would be a real issue without this intermediate cable. I spoke with Lokar about that and they made it sound like I was the only one that had ever mentioned this to them before. I honestly can't believe that is possible, but whatever... Now I have a not so attractive hand brake assembly above my floor. So I made a cover for it. I will ultimately cover it with something. Carpet, vinyl, leather, I don't know. But at least I have a cover made that I think will be decent looking.

20781-46335653c914d4e54e503c1c225ca573.jpg

It really doesn't take up much space since I didn't use the Lokar mount and the brake is basically right up against the tunnel. I drilled and tapped some holes in my angle iron to hold the cover by 2 of the screws that hold the boot bezel on. It seems quite rugged.
20782-bf8252f3202816d11a04fc1fa72b632c.jpg


Still some finish work to do, but at least the floor work is done. I need to finish up the rest of the underside of the car with POR15 and this hole in the floor was one of a few things that are holding me back.

Til next time...

2016-01-23 20.20.23.jpg


2016-01-24 11.22.31.jpg


2016-01-24 13.46.21.jpg


2016-01-27 22.06.30.jpg


2016-01-29 21.41.27.jpg
 

Moparz10

Member
Joined
Oct 5, 2015
Messages
19
Reaction score
0
Location
California
Love the build,i was hoping to pick your brain a bit regarding the borgeson box,i am undecided between that and the firm feel stage 3 box and looking for some guidance, 72 challenger,hotchkis upper control arm,stock lowers with stiffening plates,1.03 torsion bars,hotchkis strut rods and their 1.5 street perfomance shocks.
 

tklockwood

Well-Known Member
Joined
Dec 17, 2014
Messages
88
Reaction score
9
Location
Corcoran, MN
Sorry I have been off the site for a while and missed this post/question. What did you end up doing, if anything? Unfortunately my car was dormant for a while but the project is back on track and going strong. More new posts to follow very soon.
 

tklockwood

Well-Known Member
Joined
Dec 17, 2014
Messages
88
Reaction score
9
Location
Corcoran, MN
Quick update with a promise of pictures to come. Been spending a lot of my saved up 'Cuda cash lately. Some stuff I have already mentioned and some stuff is new additions to my build plan. I now have the evaporator and brackets from Vintage Air. I need that part up front to help me plan my firewall. What holes stay, what holes go? And what new holes will be needed...? I found a local place in Otsego, MN not far from me that can help so I have started buying what I can from him. I like to support local small businesses. He also has the tools and ability to make custom a/c lines. For locals, the place is Pal's Hot Rod Parts. I now buy anything he carries that I need from him.

I also have my Gear Vendors overdrive now. I plan to bolt it to the supplied tail shaft and bolt it into the car on the factory crossmember. This will be just so I can see potential issues with floor clearance. Once I am comfortable with clearance I can finish the underside of the floor.

I decided to bite the bullet and go with EFI on this car right up front. I bought a throttle body kit from FITech. For 1000.00 bucks you get a nice self contained and self learning system. Still need a proper fuel delivery system to match, so I ordered a Tanks, inc. EFI gas tank, sender, and fuel pump (through Pal's, of course). I just ordered that so I don't have it yet.

My engine is at Sharadon Performance in Hugo, MN getting assembled. I was going to do it myself but had more than enough work to do so I took it to them. It is mostly assembled but last I knew was waiting for paint. I am doing something unusual with the engine paint color. I want the engine to be the blue color from the Mopar M. It is very difficult to get the exact color for that, especially in paint. I found a Mopar document that discusses the accepted use of the M, and it includes print color information. It is Pantone 293 (as I recall), but paint companies don't know Pantone colors. So I ended up buying a plastic color chip from Pantone (for like 27 bucks) that is this color. Now we are waiting for a paint company to match that color. Then the engine can be painted and finished. I think in a white engine compartment that will really pop.

I decided to eliminate the factory mechanical linkage for the clutch and switch to hydraulic. I have found self contained units for this that fit inside the bell housing but not for the 18 spline Hemi four speed. So I dreamt up my own. I wanted the clutch master to sit next to the brake master, I don't know why. So I made a new backing plate for the brakes and the clutch to mount on the firewall. I made a fixture to allow me to test this in my vise. I also made a bracket to mount on my bell housing to hold the clutch slave cylinder. I also had to make a custom piece to transfer the pedal pressure to the new hydraulic master. I think I have pictures of most of that and will find them and post them.

I am also replacing the factory gauge cluster with all Auto Meter Mopar branded gauges. This will require a whole new cluster which I am making out of steel and plan to cover with textured plastic that I bought from eplastics.com. I have the tach and electronic speedo, plus 2 5/8 oil pressure and water temperature, plus 2 1/16 fuel level, volts, and boost/vacuum. No boost for now but I bought it just in case. I also have a 2 1/16 A/F display from Innovate. The gauges are all back lit with blue leds and the Innovate piece is a blue digital display. Kind of a blue thing going on. Pics as I progress on that as well.

I also bought a replacement steering column with tilt. And no ignition key. I ordered this because I have always thought 'Cudas could use tilt wheel. The column comes out of the dash at such a low angle that there is not much space between the steering wheel and the seat. I also ordered it so it will extend further out of the dash before it widens up to the "shroud" diameter. This will eliminate the E body crush can and give me more room for my custom gauge cluster. Pics to follow on that as well.

That is where I am right now, but I have a lot of time off for the holidays and plan to get a lot done during that time.
 

tklockwood

Well-Known Member
Joined
Dec 17, 2014
Messages
88
Reaction score
9
Location
Corcoran, MN
20160820_204358.jpg

Above is a fixture I made to test my hydraulic clutch configurations. I just pushed on the bar with my hand to see the required effort. The hard line looping down is heading to the slave cylinder mounted on the engine you can just see.
20160828_184124.jpg

This is my new backing plate to hold the brakes and clutch master cylinder. It isn't finished here but has since been completed and is out getting powder coated. I will post pics of it when it comes back.
20160904_141405.jpg

Another shot of my test fixture you can see more of my 318 test mule in the background.
20160904_141441.jpg

This is the bracket I made for the clutch slave cylinder. Here it is bolted to my Lakewood scatter shield. I have video of it working but the site won't let me upload video. But it does work... More pics as I can.
 

tklockwood

Well-Known Member
Joined
Dec 17, 2014
Messages
88
Reaction score
9
Location
Corcoran, MN
Thanks for the kind words. I struggle a lot sometimes but usually manage. I have been at it a lot lately and will have more pics soon.
 

tklockwood

Well-Known Member
Joined
Dec 17, 2014
Messages
88
Reaction score
9
Location
Corcoran, MN
I have been doing a lot of stuff not really worthy of pictures but it has been good progress. I bought my overdrive from Gear Vendors just so I could test fit it in the trans tunnel. Since I don't have an engine, transmission, k member, etc. I had to get creative. I bolted the overdrive unit to the replacement transmission tail shaft housing, bolted it to the transmission crossmember, and bolted that into the car. While I didn't have the engine there to hold the front position and force the front to rear alignment, I believe it was enough to tell where any interference would occur with the floor. We slid it front and back as far as the mount would allow and marked any points we thought it would touch. A little hammer massage and we were, I believe, good to go. Nothing really worth a picture though.

I bought the evaporator box and mounting hardware from Vintage air. I mounted it according to their instructions which involved two bolts through the firewall from the engine compartment and two sheet metal screws from inside the car into the cowl area. This worked fine but I decided to improve it. I didn't want additional bolts visible on the firewall so I used some nuts to hold threaded rod in place through the firewall, then I welded the inside nut to the passenger side of the firewall. Finally I removed the engine side nut, threaded the rod until it was below the firewall surface and filled the hole with weld. Then I ground it smooth on the engine side so you can't see it anymore. I should have taken more pictures. Net result is two studs sticking out of the passenger compartment side of the firewall.

Then I made a small piece of steel to hold bolts to replace the sheet metal screws at the top that go into the cowl. I opened the holes up to allow my bolts to go through, and then drilled a third hole between the first two. Then I reached up into the cowl from outside and stuck the bar with the two bolts into position. I used washers and nuts to hold it tightly into position, and then plug welded the center hole to hold it into place. Voila! Four studs that you can just slip the evaporator onto and use 4 nuts to hold it. You can see the two cowl studs here. The others are hidden below the cowl.
20170115_160406.jpg
 

tklockwood

Well-Known Member
Joined
Dec 17, 2014
Messages
88
Reaction score
9
Location
Corcoran, MN
My engine has been at Sharadon Performance for over a year waiting for assembly. They had some personnel issues that caused this delay, but my engine is finally finished. As previously mentioned on here it is a stroker 360 for 408 cubes. I was hoping for 450 horsepower and close to 500 ft lbs. of torque. We dynoed it Wednesday and it made 439 horsepower and 506 lb ft. of torque. I can live with that. In these days of Hellcats and 1000 hp street cars that may not sound like much but for what I plan to use the car for it is pretty much perfect.

I wanted it painted the blue that Mopar uses for their round "M" logo. This turned out to be much more difficult to do than I would have guessed. I started out talking to paint suppliers. They had no idea. Then I tried to order one of the Mopar edition stripe kits. They won't sell it to you unless you prove you have one and show pictures of the damage. Seriously? Then I found a 14 page PDF document from Mopar that describes all of the ways that you are allowed and not allowed to use their trademarks. It was intended for use by the printing industry and even specified the Pantone color for the "M" as Pantone 293C. Now I just needed something that color. I ended up ordering a plastic chip from Pantone in that color code. It was a little over an inch by like 2 inches and cost me like 27 dollars including shipping. Then Sharadon took that to their paint supplier and had them match it. They use Sherwin Williams and it turns out they have a code for that color. Unfortunately, they haven't given me back my color chip and given me that paint code yet. But it is supposed to be in the mail. But here is the motor on the dyno.

20170111_150618.jpg
 

tklockwood

Well-Known Member
Joined
Dec 17, 2014
Messages
88
Reaction score
9
Location
Corcoran, MN
I am trying to clean up my engine compartment as much as I can. I am filling any holes in the firewall that I don't need and will also try to minimize visible wires for a cleaner look. I do not like the look of the factory bulkhead connectors, and so much of the car will be non-standard that I have decided to eliminate the factory wiring, the bulkhead connector, and most of the visible wiring, at least partly by using a Painless Performance Mopar wiring kit. I have started filling holes in the firewall and have closed in the hole for the bulkhead connector. Still a lot of clean up to do but at least I have started.

20170115_160346.jpg
20170115_160352.jpg
 

tklockwood

Well-Known Member
Joined
Dec 17, 2014
Messages
88
Reaction score
9
Location
Corcoran, MN
I almost forgot... in the engine picture you can see my FITech fuel injection unit. This is a $1000.00 self learning unit that is almost completely self contained within the throttle body. We initially did our dyno testing with a holle carb but also tested with this unit that will be used in the 'Cuda when it is done. The fuel injection system came within a couple of horsepower of the carb with no time to learn the engine. I am very excited to be using this in my car.

Because of the fuel injection I have purchased a new gas tank from Tanks, Inc. for the car. I bought the tank, a vertical, cylindrical sending unit, and a Waldron fuel pump and pickup. I have assembled the fuel pump and pickup but not installed it in the tank yet. Everything looks very nice and I expect no issues with this configuration.

20170114_201324.jpg
20170114_204924.jpg
 

TC_Cuda

Well-Known Member
Joined
Oct 10, 2016
Messages
146
Reaction score
47
Location
Utah
I have been seriously considering the Fitec EFI. Please post more of your experience with it as you go. Also what is the rated HP for your system and fuel pump.

And again WOW what a project, your skill's are impressive. Please post more, more, and more.
 

tklockwood

Well-Known Member
Joined
Dec 17, 2014
Messages
88
Reaction score
9
Location
Corcoran, MN
I was working on my gauge cluster yesterday. I have been nervous about using a hole saw to cut the holes for my gauges in the sheet metal piece I had made. I frequently have these hole saws grab suddenly without warning. I was afraid that as I had more and more of the holes cut that the panel would be weaker and weaker and that a sudden grab by the hole saw could basically wad it up. To prevent that happening I basically sandwiched as much of the panel as I could between to 1 by 6 boards and clamped it tightly to hold it securely while I did the drilling. It was a pain to do but I believe it helped and I managed to drill the holes in the sheet metal without damaging it.

I also have this plastic sheet I previously got from eplastics.com. It is black textured plastic that came in a 2 by 4 foot sheet. I cut that to the same size as my sheet metal and then used my little sheet metal brake to bend it to match the angle of my new panel. Then I clamped that gently to the sheet metal and drilled the matching holes in that from the back. The net result is a gauge panel that has a black textured background. I couldn't resist putting it together temporarily to see how it would look. The extra holes on the ends are for Vintage Air vents. I plan to use their ProLine Penta Slyders. They are round on the outside, aluminum, and have a sort of 5 pointed star effect. They are opened and closed by pushing and pulling the center of the vent. That movement causes a sort of throttle butterfly inside to open and close. Very cool, but they are pretty proud of them. Not cheap. I need to get those ordered so I can finish the rest of this up.


20170121_221042.jpg

Above at the two panels sitting on my bench. They don't look like much until they are together...

20170122_102817.jpg


The layout is sort of optimized to allow good visibility through and around the steering wheel. I probably should have had the fuel level and volt gauges slightly further in, but this will be fine. If I ever redo it I will adjust them slightly but it isn't worth a rework now. Also, I still need to add leds for the turn signals, high beam indicator, and brake warning light. I found some really nice ones online that are in black anodized, billet aluminum panel mounts. I think they will look killer on there.

This panel, if you can't tell from the pictures is the full width of the dash opening in the 'Cuda so it also uses the space normally occupied by the headlight and wiper switches. They will be relocated down to where the climate controls normally go, and the climate controls will be in a console under the center of the dash. I spent a lot of time figuring out how I wanted this layout to be and I expect I will like the finished product.

Also, the space normally occupied by a radio will have a boost/vacuum gauge (matching Mopar gauge from Autometer) and a digital A/F ratio gauge from Innovate. The motor is normally aspirated for now, but the vacuum part will work and if I ever boost it I don't have to add a boost gauge.
 

tklockwood

Well-Known Member
Joined
Dec 17, 2014
Messages
88
Reaction score
9
Location
Corcoran, MN
I have been seriously considering the Fitec EFI. Please post more of your experience with it as you go. Also what is the rated HP for your system and fuel pump.

And again WOW what a project, your skill's are impressive. Please post more, more, and more.

Ok. I will be sure to post any noteworthy experiences once I get the car together. I have the 600 hp capable unit, and as mentioned, my motor is just under 450 hp. When I bought the gas tank from Tanks Inc I bought a walbro that Tanks Inc calls a GPA4. It is their middle unit. I seem to recall the one below it stopped around 400 hp so I went with the one above it. But, of course I haven't used it yet.
 

tklockwood

Well-Known Member
Joined
Dec 17, 2014
Messages
88
Reaction score
9
Location
Corcoran, MN
I keep jumping around working on different parts of the car. This is at least related to my previous post about the dash and gauges. I do not smoke and do not feel a need to have an ashtray in my 'Cuda. I also do not particularly like crawling under the dash to check fuses. So I decided to convert the ash tray to a convenient place for the fuse box. The current Mopar harness from Painless uses a tiny little fuse box that is perfect for my ash tray mounting idea.

I started out a while back planning to put their small auxiliary fuse panel in there but since I have decided to use their whole harness I am switching it up. The ashtray housing that screws to the dash frame and holds the ashtray/door is oddly shaped to allow for a cigarette lighter as well as an ash tray. So I decided to make my own. So far the main part of this is just made of cardboard but that will ultimately be converted to steel. I also decided to use the entire wedge shaped space that the ash tray represents.

Here is the cardboard version of the new housing.
20170128_155114.jpg

And here it is tucked into the dash opening. The way it is now made the top will essentially be horizontal and the back (inside) will be vertical.
20170128_155134.jpg


The wiring kit came with this crazy plastic bracket for mounting the fuse box. It looks like it is expecting a couple of keyhole slots to hold it and another rectangular opening for a latch to hold it in the keyholes. I am making a piece like this that will be attached to the back of the metal version of the cardboard model above. The fuse box will actually stick through a rectangular opening into the new ashtray housing and the wires will be invisible from the front.

Here is that piece with crude openings to accept this mount. It isn't pretty but it will work. The plastic mount is shown next to it.

20170128_155206.jpg


Here I am holding this bracket onto the back of my cardboard model to show how it will be.

20170128_155235.jpg


Here is the plastic mount in place in the new bracket and then the other side where you can see the holes I had to make and the plastic of the mount sticking through. It looks like it will work fine.

20170128_155301.jpg


20170128_155308.jpg


And here is the tiny fuse box that will end up in this new ashtray housing when I am done. It is amazingly tiny.

20170128_155328.jpg

20170128_155335.jpg

I will post more when I have it done and mounted in the dash.
 

tklockwood

Well-Known Member
Joined
Dec 17, 2014
Messages
88
Reaction score
9
Location
Corcoran, MN
Just realized my last update was in January. That is a long time ago. A lot of the work this year would have resulted in "more of the same" type postings. I spent a lot of time on the floor, modifying it to take the planned mid 80s Daytona seats, finishing the clean up and coating of the bottom of the floor, and various other little tasks.

The Daytona seats are out being reupholstered in leather and the factory rear seat is being done to mimic the look of the Daytona rear seats but will still fit like the originals. The work is being done by Fred Mattson who recently had an upholstery book published. Looking forward to seeing those.

My last pics showed some of the progress on my wiring prep work. Here are some additional pics of that. I haven't worked on that for a long time but will be doing so very soon. More to follow...

1A46117D-48D5-4B10-933D-598FE4F03453.jpg
744379A5-02D3-431F-8112-5F80CAD2EAFB.JPG
45BA05C2-EEC2-4A7E-B89B-BA5AF4883A21.JPG
B27287C5-101B-405C-A815-8A13E88FFAB9.JPG
 
Back
Top