• Welcome to For E Bodies Only !

    We are a community of Plymouth Cuda and Dodge Challenger owners. Join now! Its Free!

Subframe connectors

sfort

Well-Known Member
Joined
Aug 31, 2012
Messages
56
Reaction score
1
Location
Granbury,TX
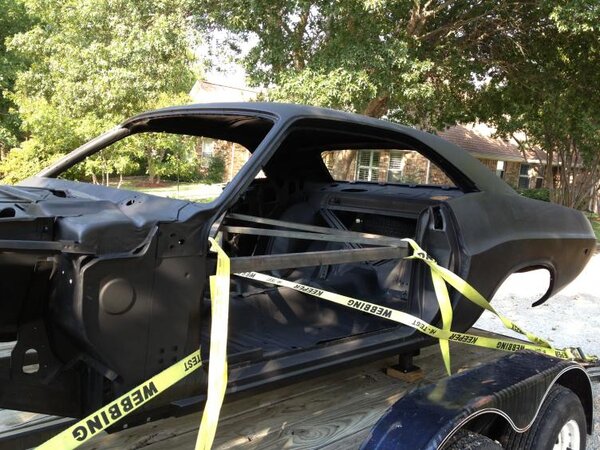
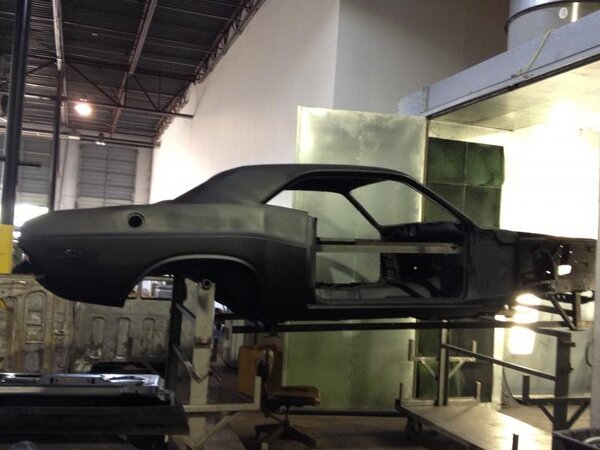
I am about to get my 73 back from the stripper. I had it chemically stripped locally using a non acid product. As I was told in the beginning it revealed alot I did not see before. The reason I am posting is I was planning to put it on a whirly jig and go ahead and do the subframe connectors. But I noticed someone else had posted they were going to put the front and rear suspension on and put theirs on the ground before putting the connectors on. Does the car need to be on the suspension and on the ground before putting the connectors on.
 

burntorange70

Moderator
Joined
Dec 25, 2008
Messages
2,393
Reaction score
108
Location
Aguanga,CA
Have seen it done both ways. Have even seen people just put the car on blocks then shim it up till the frame is straight.

Jig would be the easy way to go as far as fitting/welding them in goes. Just make sure the frame,chassis is straight.
 

sfort

Well-Known Member
Joined
Aug 31, 2012
Messages
56
Reaction score
1
Location
Granbury,TX
I currently have the car on a jig mounted in the front to the K member mounting holes and in the rear I used the front leaf spring mounting location. I supported it front to back and side to side. I also welded in cross bracing inside the car. I plan to leave this on while on the rotisserie. Going to be interesting when I start measuring things.
 

ramenth

Well-Known Member
Joined
Oct 7, 2009
Messages
2,106
Reaction score
104
Location
Beaver Dams, NY
I currently have the car on a jig mounted in the front to the K member mounting holes and in the rear I used the front leaf spring mounting location. I supported it front to back and side to side. I also welded in cross bracing inside the car. I plan to leave this on while on the rotisserie. Going to be interesting when I start measuring things.

If you're worried about any kind of twisting while it's on the rotisserie, you shouldn't be with the cross bracing inside the car, as long you welded it in with the car sitting on the jig.

As burnt pointed out, there are two schools of thought on this. I've personally never had any problems with welding in frame connectors with the car on the rotisserie. Once I was done, the body panels all lined up, SAI was still intact and took good alignments. There are others who will say that the car must be in a "natural" state. I can see both sides of the debate.
 

burntorange70

Moderator
Joined
Dec 25, 2008
Messages
2,393
Reaction score
108
Location
Aguanga,CA
Thats so very true Robert. Just depends on who you ask.


Another thing I like to point out is these cars had wide tolerance ranges when built. Just putting the car on the wheels does not necessarily mean it is going to be right. Just depends on each car though. Some can be good and others off a little. Will it be off enough to matter? I cant say but if you are taking the time you may as well check and tweak if needed.
 

sfort

Well-Known Member
Joined
Aug 31, 2012
Messages
56
Reaction score
1
Location
Granbury,TX
Next question. Looking at the US Car Tool frame connectors and torque boxes I see that they offer a kit that also addresses the front fender mounts and the core support. Are these areas known weak points with regards to a 400hp motor or only something that needs to be addressed for much higher hp? While I was doing the disassembly I found a star crack under the passenger fender I think in the cowl area.
 

moparleo

Well-Known Member
Joined
Oct 17, 2011
Messages
6,942
Reaction score
1,735
Location
So. Cal. Riverside area Moreno Valley
Its a good idea to remove the fenders so you can do a full inspection of the front end of the car. As you said, you found a crack that will need repair. One of the main advantages of using a rotisserie is having complete access to all areas of the car.
The stiffer you can get the uni-body structure, the better it will ride, and handle. Also eliminates popping and creaking sounds from the suspension.
 

sfort

Well-Known Member
Joined
Aug 31, 2012
Messages
56
Reaction score
1
Location
Granbury,TX
Got it home

IMG_2979.jpgIMG_2920.jpg US Car Tool Part Number USCT1M1002. Got the car picked up and I am really happy with the cleanliness and prime job that was done. Anxious to get it to the school where I am doing the work. A local community college has a custom auto class where you are able to,when room permits, take your project car in and work on it for the semester. Most of the guys in my class are in their 60's to 70's. We do have a younger woman that is in the afternoon class who is working on her second car to restore. A VW 4 seater pickup. Hopefully the pics of my car above will come out!

IMG_2979.jpg


IMG_2920.jpg
 

moparleo

Well-Known Member
Joined
Oct 17, 2011
Messages
6,942
Reaction score
1,735
Location
So. Cal. Riverside area Moreno Valley
Community colleges are an excellent source for working on your car where space is limited and you can learn from others in the class. I use to use the High School summer night school course to do my heavy work in. The school had a fully equipped Snap-on tool crib, Sun diagnostic and distributor machine for setting advance curves. Valve grinding equipment, welding equipment, hot tank tec... and a very knowledgeable instructor. Can't beat it.
 

ramenth

Well-Known Member
Joined
Oct 7, 2009
Messages
2,106
Reaction score
104
Location
Beaver Dams, NY
View attachment 13384View attachment 13385 US Car Tool Part Number USCT1M1002. Got the car picked up and I am really happy with the cleanliness and prime job that was done. Anxious to get it to the school where I am doing the work. A local community college has a custom auto class where you are able to,when room permits, take your project car in and work on it for the semester. Most of the guys in my class are in their 60's to 70's. We do have a younger woman that is in the afternoon class who is working on her second car to restore. A VW 4 seater pickup. Hopefully the pics of my car above will come out!

You wouldn't happen to be in Georgia would you? I met a woman last year that's on her second or third go around with a local community college working on her cars. I think her son may be going back for the second or third time himself.
 

sfort

Well-Known Member
Joined
Aug 31, 2012
Messages
56
Reaction score
1
Location
Granbury,TX
No Ramenth I am in Dallas TX. Did you get a chance to look at the US Car Tool sight? I have been going over the car marking areas that need to be addressed with white chalk and taking lots of pics for the scrap book. Have found quite a lot of surprizes but most are pinhole stuff. The rear lower quarters are going to need work and the drivers front floor. Is AMD one of our sponsors. I will post a couple of pics and load up my album.

105_1087.jpg


105_1088.jpg


105_1092.jpg


105_1097.jpg


105_1100.jpg


105_1103.jpg


105_1101.jpg


105_1108.jpg


105_1109.jpg


105_1116.jpg


105_1117.jpg


105_1118.jpg


105_1119.jpg
 

ramenth

Well-Known Member
Joined
Oct 7, 2009
Messages
2,106
Reaction score
104
Location
Beaver Dams, NY
No Ramenth I am in Dallas TX. Did you get a chance to look at the US Car Tool sight? I have been going over the car marking areas that need to be addressed with white chalk and taking lots of pics for the scrap book. Have found quite a lot of surprizes but most are pinhole stuff. The rear lower quarters are going to need work and the drivers front floor. Is AMD one of our sponsors. I will post a couple of pics and load up my album.

Yeah, I looked at the link. Was wondering what made it different than the XV pieces.

That's the nice thing about having the car stripped and primed. Get to see all those areas really stand out. Looks like a nice project to deal with. I'm from upstate NY. We find a car with that little rust and we're dancing a jig.
 

Bill

Well-Known Member
Joined
Oct 6, 2012
Messages
593
Reaction score
55
Location
Vermont
And the "Watoosie"! Looks like it's in great shape. When I purchased my 73 Rallye in New Hampshire July 2012 the guy who was selling it told me "all you got to do is block sand it and paint it and it's good to go". I poked my head under teh car to check the frame rails and cross members and I asked him " what about these 3" rust holes in the frame rails where there is no metal left?". There was no metal under the rear sway bar brackets too. We worked out a deal and it gave me an excuse to build a rotisserie and purchase a plasma cutter (lol).
Yeah, I looked at the link. Was wondering what made it different than the XV pieces.

That's the nice thing about having the car stripped and primed. Get to see all those areas really stand out. Looks like a nice project to deal with. I'm from upstate NY. We find a car with that little rust and we're dancing a jig.
 
Last edited:

sfort

Well-Known Member
Joined
Aug 31, 2012
Messages
56
Reaction score
1
Location
Granbury,TX
I'm not unhappy at all just surprized at what was lurking under one layer of paint. The car came out of Abilene. I am thinking it was found in a junk yard there. Three of the four corners is smashed and the only explanation for the tail panel to me is a big hook.
 

sfort

Well-Known Member
Joined
Aug 31, 2012
Messages
56
Reaction score
1
Location
Granbury,TX
Have any of ya'll ever replaced the freshair flaired opening in the cowl. There is some rust damage here do to rats packing it with insulation which got wet and held moisture. It looks like there is a gasket or sealing material around the edge of it. Is it spotted in or stuck in place?
 

sfort

Well-Known Member
Joined
Aug 31, 2012
Messages
56
Reaction score
1
Location
Granbury,TX
Wow! I cant believe it has taken a year to get this far. I went with Firm Feel for their Kmember kit (alot of welding), LCA kit, and UCA's. Did all the welding myself (TIG) so there was a learning curve involved. Once that was done I ordered US Car Tools Kit for frame connectors, fender braces, torque boxes, and core support (alot more welding). Still have the core support to do. Than body panels!

IMG_4006.jpg


IMG_3982.jpg


IMG_3315.jpg
 
Back
Top