• Welcome to For E Bodies Only !

    We are a community of Plymouth Cuda and Dodge Challenger owners. Join now! Its Free!

Help removing fan from 70 440 Cuda

Joined
Jan 26, 2013
Messages
24
Reaction score
0
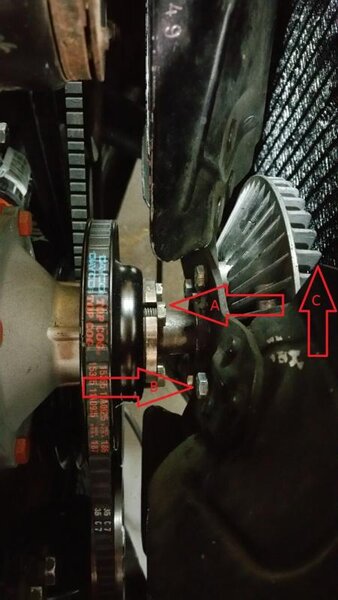
I need to install a fan shroud on my 70 440 cuda so that I can get the factory air worked on. This is probably a stupid question but which bolts need to be removed to get the fan off? A B or C on the front thermal clutch? See the lettered lables on the picture below. In case its too hard to read the A arrow points left, the B arrow points right and the C arrow points up. I think I need to remove A but they all look like a bear to reinstall so I don't want to pick the wrong ones and regret it - not to mention I will have to remove others to get the job done. Any and all advice is welcomed as well as other better ways to get it done.


20150527_180608_labled resized.jpg

20150527_180608_labled resized.jpg
 

moparleo

Well-Known Member
Joined
Oct 17, 2011
Messages
6,939
Reaction score
1,727
Location
So. Cal. Riverside area Moreno Valley
Are you having this done professionally or by a friend? If being done by a garage, they will have much more experience and less likely to damage something. And if they do, it is their nickel to fix it. If you are having a problem diagnosed , the fan clutch will need to be tested. That can be done without doing anything. To install a fan shroud you can maybe get by with just removing the fan to clutch bolts and backing the fan towards the engine. These are bolts lettered "B" None of this is real hard to get to unless you have really big hands and fingers.

If there is insufficient clearance between the fan clutch and radiator, you will just need to remove bolts "A". Just be sure to loosen the tension on the water pump belt before you loosen the bolts.
 
Last edited:

js29

Well-Known Member
Joined
Aug 5, 2012
Messages
671
Reaction score
152
Location
lee center ny 13363
i have found it easier to loosen the fan to water pump bolts a half turn before taking the tension off the belt. use the belt to hold the pulley still while cracking the bolts loose.
 

challenger6pak

Well-Known Member
Joined
Feb 27, 2011
Messages
4,037
Reaction score
897
Loosen bolt A without loosening the belt. Once all bolts A are loose, but not off, loosen the unit adjustment that is holding the belt tight. It may be the alternator or the power steering pump. I can't see how your engine is set up. Make the belt loose and finish removing the fan and clutch A bolts. Put fan and clutch inside the fan shroud and lower the two together back in front of the radiator. Bolt A back up. Make sure the belt is around the pulley when you bolt A down. Once A is tight put belt in place and tighten the adjusting unit to make the belt tight. Lastly bolt on the shroud.
 

crash520

Well-Known Member
Joined
Nov 20, 2013
Messages
46
Reaction score
3
Location
Ipswich, Australia
Could it be easier to dump your fluid, remove the radiator, put the shoud over the fan, bolt the radiator back in then the shroud to the radiator?? you just then working on bolts out to the side with plenty of room.
 

Daves69

Well-Known Member
Joined
Feb 4, 2014
Messages
317
Reaction score
99
Location
ChiWest
Knuckle scrape time if you leave the radiator in.
Protect your hands and radiator. Cover the radiator with thin plywood or at least some cardboard.

You may need two long wrenches if the belt slips. One placed on a bolt head "A" and against the fan shaft to counter act the loosening of another bolt "A".

You may also experience the fan wanting to hang on the locating nose coming through the pulley. A tap with a small dead blow should loosen it.
 
Joined
Jan 26, 2013
Messages
24
Reaction score
0
Wow, what a great bunch of information - I will use it all but I will try and leave the radiator in place. The cardboard for protecting the radiator is something I would not of thought of - but is the kind of thing I would have wished I would have after I did some damage. Loosening the bolts while the belt is tight is another Gem. Mechanics gloves definitely. I am sure I will be brushing up on my Expletives when I try to get the bolts back in place, I might even ask my wife to start them since her hands are a lot smaller than mine. Pay back for all the bugs she has made me kill for her over the years. I figured I would get a reply or two..... but this is way beyond my expectations. Thank you all SINCERELY.
 
Joined
Jan 26, 2013
Messages
24
Reaction score
0
Ok I got the fan off shroud and fan back on. The cardboard Daves69 suggested was fantastic like I thought when he said it. Now that the shroud is on (it has a label genuine Mopar or something to that effect). But it rubs the fan at the top. I loosened the screws to both the radiator to vehicle and shroud to radiator and pulled them both up hard before tightening in their highest position. if I flex the top ofthe shroud up tight to the radiator and hold it there the fan clears. The shroud seems to be distorted. Tried the shroud screws looser and tighter in case that was warping the shroud without much affect. I'm wondering if I clamp the shroud tight to the radiator st the top and apply some heat with a heat gun keeping it moving if it would cool in a better position? I can't see any other adjustments that would help. I have also considered shaving the inside circumference of the shroud but its hard to tell if it would just lean further down on the blades if I did. Its possible that I just got a warped shroud but it is a good amount of hassle to remove everything and return it to jegs. So I just want to make sure there is not something that is escaping me. Thanks in advance.
 

moparleo

Well-Known Member
Joined
Oct 17, 2011
Messages
6,939
Reaction score
1,727
Location
So. Cal. Riverside area Moreno Valley
Just remove it. Don't try to modify it or you will just end up buying another one. Something is wrong and it probably isn't the shroud. Two things that will affect the alignment are the motor mounts and trans mount. The fan surface should be parallel to the radiator face. After removing the shroud, you can check the alignment of the fan blade and radiator.
 

challenger6pak

Well-Known Member
Joined
Feb 27, 2011
Messages
4,037
Reaction score
897
I agree with Leo. Something needs to be corrected. Is it an original Mopar radiator? What are the numbers on the top of it? Post some pics of the radiator top and the fitment. I know the old Modine replacement raditors would cause the problem you are having.
 
Last edited:

Daves69

Well-Known Member
Joined
Feb 4, 2014
Messages
317
Reaction score
99
Location
ChiWest
Check with others that have the same setup but I'm thinking 1/4" clearance minimum. If your side to side is good, a couple shims between the trans mount and tail house may get you there.
 
Joined
Jan 26, 2013
Messages
24
Reaction score
0
OK I got it working. I ended up enlarging the holes in the shroud some so that I could mount it a tad higher. Also found that there was a high spot of solder or weld on the radiator that when I tightened down the screws distorted the shroud in a very slight arch as you look down on the radiator. I dremeled a tiny notch out of the shroud for the high spot to fit into and BINGO. Now on to the AC repair.
 

moparleo

Well-Known Member
Joined
Oct 17, 2011
Messages
6,939
Reaction score
1,727
Location
So. Cal. Riverside area Moreno Valley
I have found that 90% of problems are usually fixed just by going back to the beginning and rechecking everything. Cars are really not that complicated. Just take your time and use common sense. Aren't you glad you didn't grind up your shroud ?
 

Challengerguy

New Member
Joined
Dec 26, 2021
Messages
3
Reaction score
6
Location
Colorado
Wow, what a great bunch of information - I will use it all but I will try and leave the radiator in place. The cardboard for protecting the radiator is something I would not of thought of - but is the kind of thing I would have wished I would have after I did some damage. Loosening the bolts while the belt is tight is another Gem. Mechanics gloves definitely. I am sure I will be brushing up on my Expletives when I try to get the bolts back in place, I might even ask my wife to start them since her hands are a lot smaller than mine. Pay back for all the bugs she has made me kill for her over the years. I figured I would get a reply or two..... but this is way beyond my expectations. Thank you all SINCERELY.

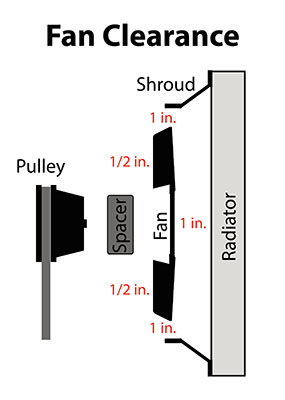
Recommended Minimum Clearances​

For best performance, follow these guidelines:

An exploded diagram showing minimum clearances for a belt-driven cooling fan.


  1. About half the depth of the blade should be inside the fan shroud.
  2. The forward edge of the fan blades should be at least 1 in. from the radiator.
  3. The tips of the blades should clear the edge of the shroud by at least 1 in.
  4. The backside of the fan blades should clear any other obstruction by at least ½ in.
    1. Belts
    2. Hoses
    3. Other engine parts
 
Back
Top