
Alright, after owning the car for 9 years as of this month, and moving it from place to place either on the garage floor, or out back annoying my neighbors and now finally into the barn/shop, I'm creating this thread in hopes it will keep me focused and motivated to get this thing underway and eventually on the road.

What I have...
1970 Barracuda vert (sadly not a "Cuda")

As far as I can tell, originally....
White top (power)
Yellow exterior
Black interior
Center console
318 2bbl
3 speed manual on the floor
8-3/4 rear (probably 3.23 but haven't checked)
Front sway bar (have te bar and LCA's have tabs)
Power steering
I have no fender tags, nor build sheets. Those are long gone as is the original motor.
What I have in parts that came with the car
3 speed manual
Inland shifter
Small block bell housing
All the vert "stuff"
Twin scoop, rally hood with pins
Original (but mangled core support)
New (to me) core support with 26" opening
Two fenders (need work but very fixable)
Parts I've procured since owning it.
New
U.S. Car tool core support brace
Dynacorn rear assembly
New torque boxes
AMD Quarter skins
AMD front floor
AMD tail light panel
AMD hinge pillars
AMD Upper Cowl
Transmission cross member
Inner fender panel "kits"
Used
3 speaker dash frame
Rally switch pod (also have the orignal non rally)
15x8 rally wheels for the back
18 spline E-Body A833
Wing with all hardware
71 challenger front clip (rails, firewall, hing pillars etc)
Hurst pistol grip shifter
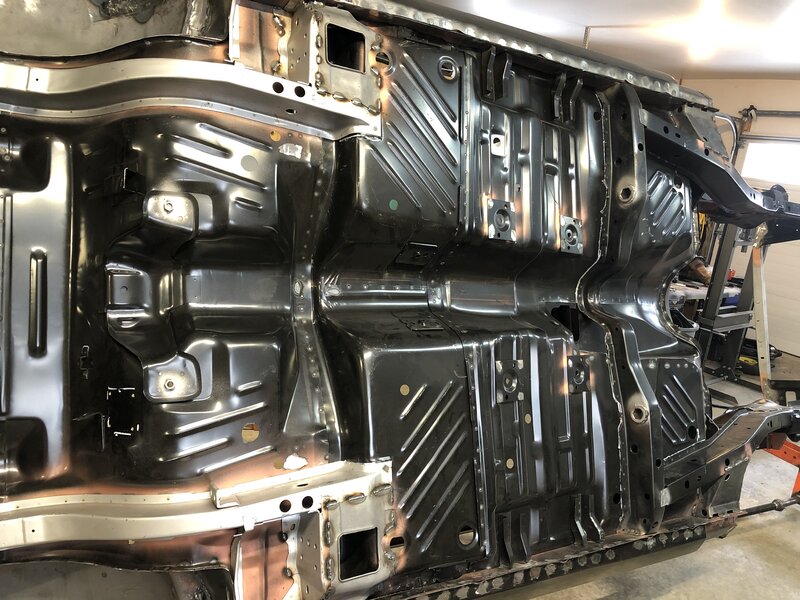
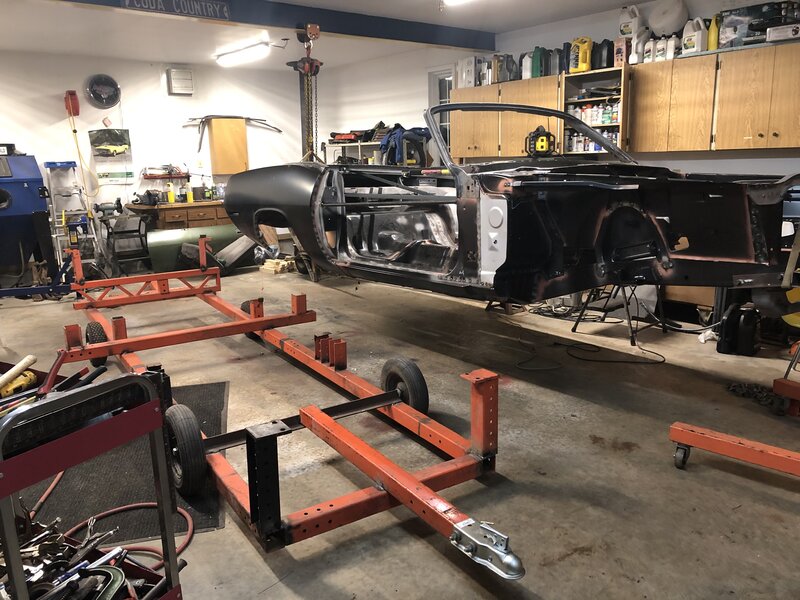
Clearly you can see it's in rough shape. Last time it was registered before I got it in 2011, was 1978. After someone decided to run it into a pole or something, it sat in a one car garage in MN for 34 years, rotting away. Lots to replace, and fabricate. As much of a challenge as this will be, the worst part is the windshield frame. It flat out scares me to be honest but I know some pretty skilled people and I'm not afraid to try anything with this. It will be slow going to be sure.
The plan going forward is to build a body jig and measure everything. I'll start with the middle and make sure everything is good (rockers, cross member, pillars etc) then move "out", starting towards the rear, then tackling the front. I haven't decided when to tackle the windshield frame yet but it will be small sections at a time and only after building reference gauges for all the contours and bracing the hell out of it.
It will be a lot of blood, sweat and tears, but they aint making any more of these things... sort of like land I guess.....
Here I go..... head first....
What I have...
1970 Barracuda vert (sadly not a "Cuda")
As far as I can tell, originally....
White top (power)
Yellow exterior
Black interior
Center console
318 2bbl
3 speed manual on the floor
8-3/4 rear (probably 3.23 but haven't checked)
Front sway bar (have te bar and LCA's have tabs)
Power steering
I have no fender tags, nor build sheets. Those are long gone as is the original motor.
What I have in parts that came with the car
3 speed manual
Inland shifter
Small block bell housing
All the vert "stuff"
Twin scoop, rally hood with pins
Original (but mangled core support)
New (to me) core support with 26" opening
Two fenders (need work but very fixable)
Parts I've procured since owning it.
New
U.S. Car tool core support brace
Dynacorn rear assembly
New torque boxes
AMD Quarter skins
AMD front floor
AMD tail light panel
AMD hinge pillars
AMD Upper Cowl
Transmission cross member
Inner fender panel "kits"
Used
3 speaker dash frame
Rally switch pod (also have the orignal non rally)
15x8 rally wheels for the back
18 spline E-Body A833
Wing with all hardware
71 challenger front clip (rails, firewall, hing pillars etc)
Hurst pistol grip shifter
Clearly you can see it's in rough shape. Last time it was registered before I got it in 2011, was 1978. After someone decided to run it into a pole or something, it sat in a one car garage in MN for 34 years, rotting away. Lots to replace, and fabricate. As much of a challenge as this will be, the worst part is the windshield frame. It flat out scares me to be honest but I know some pretty skilled people and I'm not afraid to try anything with this. It will be slow going to be sure.
The plan going forward is to build a body jig and measure everything. I'll start with the middle and make sure everything is good (rockers, cross member, pillars etc) then move "out", starting towards the rear, then tackling the front. I haven't decided when to tackle the windshield frame yet but it will be small sections at a time and only after building reference gauges for all the contours and bracing the hell out of it.
It will be a lot of blood, sweat and tears, but they aint making any more of these things... sort of like land I guess.....
Here I go..... head first....
Last edited:
")


 Fantastic job of welding on that vert


